Understanding a Plant That No Longer Depends on Its Cotyledons: Key Insights for Growth Success

If you’ve ever started seeds at home—whether it was tomatoes on a sunny windowsill or beans in a paper cup for your kid’s science project—you’ve probably marveled at those first little green paddles that pop out of the soil. Cotyledons, right? They seem so sturdy, so essential. But here’s a confession: I used to treat those cotyledons like precious heirlooms… and that led me (and a lot of other gardeners, if we’re honest) straight into a bunch of rookie mistakes.

Let’s break down what really happens when a plant graduates from its cotyledons—and the blunders everyone makes but hardly anyone admits.
The Cotyledon Trap: Why Most People Baby Their Seedlings Too Long
I remember back in spring 2019, hovering over my tray of sunflower seedlings with the nervous energy of a new parent. The cotyledons looked plump and healthy. So naturally, I hesitated to move or feed them until they shriveled up. Big mistake! Here’s what no one told me: waiting for those cotyledons to vanish before treating my plants like “real” plants actually stunted their growth.
Most advice will say “wait for true leaves.” But what does that look like in real life? And more importantly—what can go wrong if you get it wrong?
Mistake #1: Assuming Cotyledons = Healthy Seedling

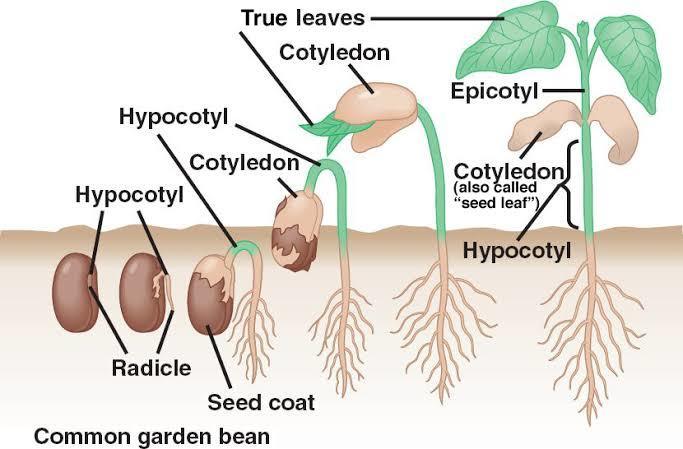
Just because the cotyledons look good doesn’t mean your plant is thriving. In fact, by the time true leaves have unfurled (think jagged tomato leaves or heart-shaped bean leaves), the plant is screaming for sunlight and nutrients. If you ignore these new leaves just because the cotyledons are still green, you’re starving your seedling during its most crucial growth spurt.
I learned this the hard way with basil starts—my first batch stayed tiny and yellowish while I fussed over their fading cotyledons. Only after switching focus to supporting those glossy true leaves did they finally take off.
Mistake #2: Overwatering “for Safety” When Cotyledons Shrivel
Here’s one that gets even seasoned growers: as soon as cotyledons start yellowing or drooping, it’s tempting to water more (“maybe they’re thirsty!”). In reality? The plant’s roots are transitioning from seed storage to full-on nutrient scavenging mode—a period when soggy soil can spell disaster via root rot or damping off disease.
A quick sensory detail: healthy seedlings at this stage feel firm and upright; sick ones flop limply even though the soil is wet. If you touch the base and it feels mushy, trouble is brewing.

Mistake #3: Waiting Too Long to Transplant or Fertilize
Everyone says “don’t fertilize too early”—but not feeding enough once true leaves arrive is just as risky! Your plant is now an independent food factory, but baby-level nutrients won’t cut it anymore.
My failed first attempt? Tomato seedlings left in their starter trays three weeks after true leaf emergence. They turned pale and leggy—like kids who outgrew their shoes months ago but never got new ones. The fix was simple (though belated): transplant once two sets of true leaves appear, then start half-strength liquid fertilizer every week.
Mistake #4: Ignoring Light Intensity Needs After Cotyledon Stage
True confession: I thought window light was plenty until my peppers grew tall and spindly post-cotyledon phase. Turns out, once plants shift from energy stored in seeds to photosynthesis via real leaves, they crave much brighter light—sometimes double what sufficed before.
If your seedlings stretch toward any glimmer of sun (the infamous “leggy” look), that’s your cue for either stronger grow lights or a spot closer to natural light—not more time under weak lighting.

What No One Talks About: Timing Is Personal
Every species’ transition looks different—and weather plays tricks with timing every year. Some oaks keep their cotyledons underground entirely; peas drop theirs within days; tomatoes stubbornly cling on even while pumping out multiple sets of lush foliage above.
The key isn’t following a textbook schedule—it’s watching your plants. Are those new leaves noticeably bigger than the originals? Do old seed coats crumble when you brush them aside? That’s independence day for your seedling—even if one stubborn cotyledon hangs on like a baby tooth!
Pro Moves From Hard-Earned Experience
- Transplant Timing: Move seedlings into bigger pots right after two sets of true leaves form—even if some cotyledons still linger.
- Feeding: Start diluted fertilizer at 1/4 strength as soon as vigorous new growth kicks in; up it gradually.
- Light: Give twice as much brightness post-cotyledon phase—even direct morning sun if possible!
- Observation: Check daily for signs of stress—wilting despite wet soil means roots may be struggling below ground.
- Dialogue With Yourself: When unsure (“Are these real leaves yet?”), compare texture and complexity—their edges are often serrated or veined versus smooth-paddled cotyledons.
A tip I picked up from an old greenhouse manager: Use sticky notes right on your propagation trays marking dates each batch sprouts true leaves—it’ll supercharge your confidence in timing all future sowings!
If there’s one thing I wish someone had told me sooner, it’s that this transition isn’t delicate—it’s dynamic! Plants want independence fast; our job is to spot it and get out of their way (while offering exactly what they need next).
So next time you spot those first complex little leaves reaching skyward while the original paddles fade away… don’t wait around second-guessing! Dive in with lights, nutrients, and space—the real growth story starts now.


