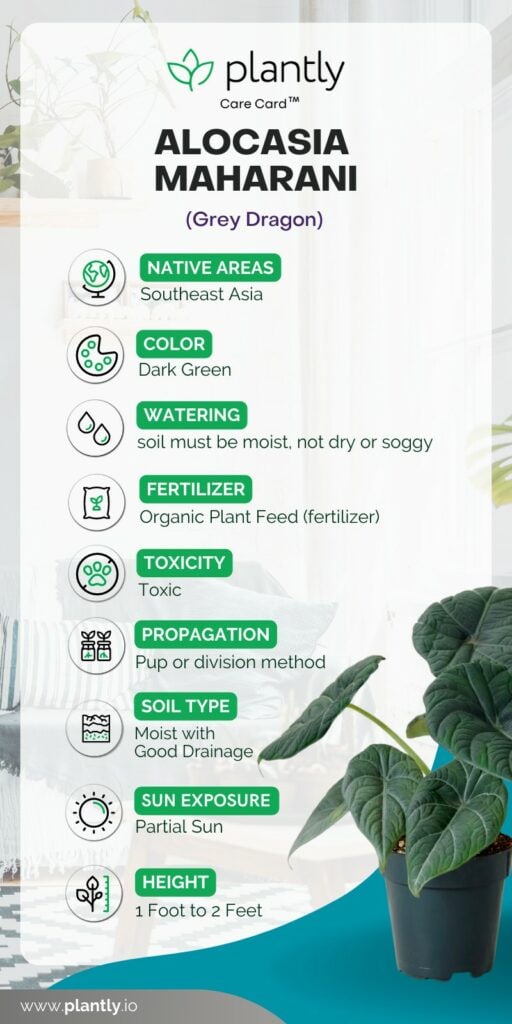
Alocasia Maharani Care: Expert Insights for Thriving Growth

When I first brought home an Alocasia Maharani, I assumed it’d be just another easy tropical beauty—a little green glow for my shelf. Boy, was I wrong. Within days, the leaves started showing weird yellow patches; then came the crispy edges and droopy stems. Nearly two months of trial and error later, with plenty of frustration (and a few lost plants), I finally cracked the code on what this “Black Velvet” really needs.
If you’re thinking about growing one or already struggling, here’s what I’ve learned firsthand—warts and all—so you can skip some of the headaches.
Why Alocasia Maharani Is More Than Just a Pretty Plant
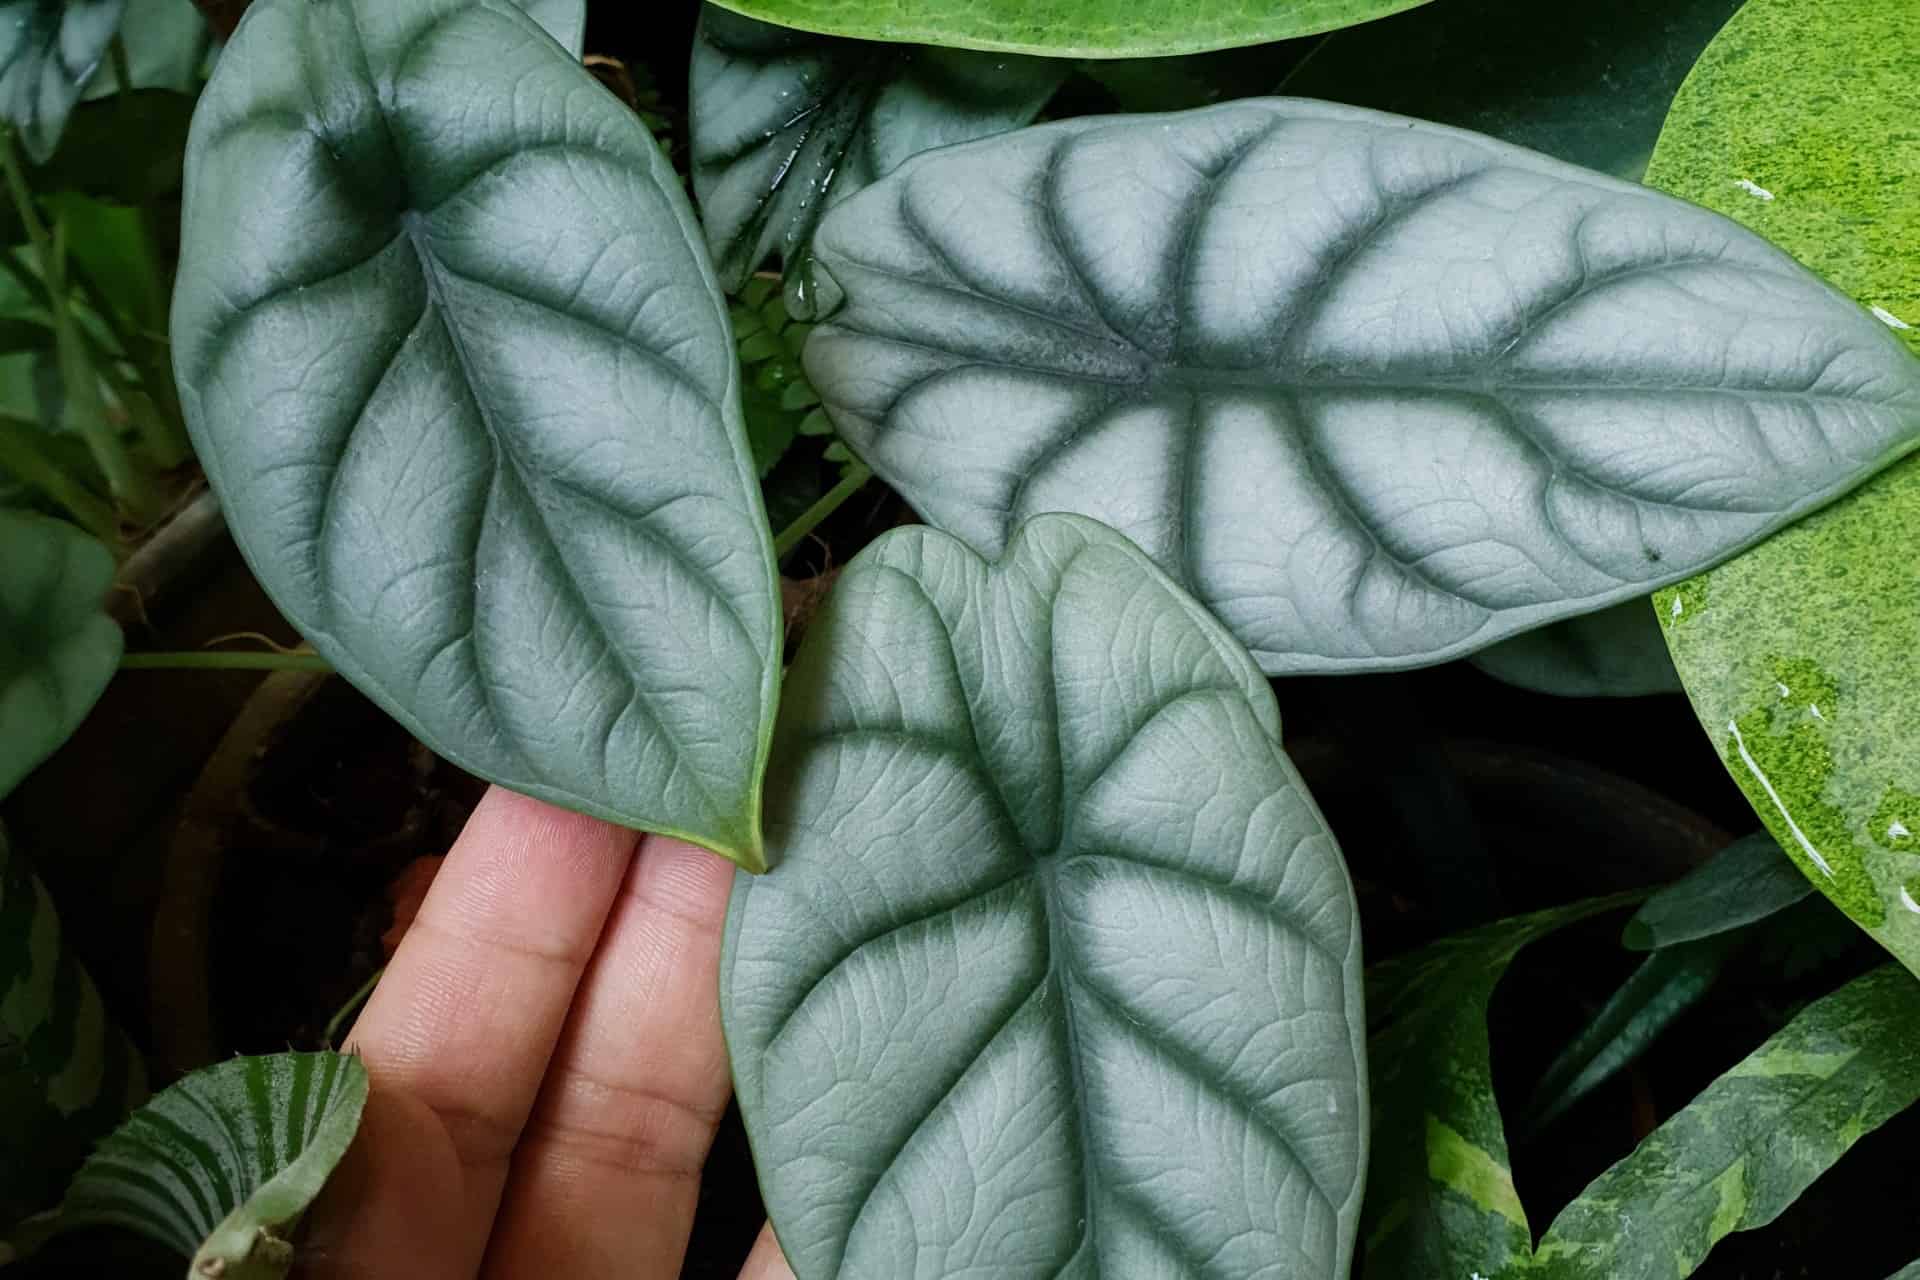
Most care guides say things like “bright indirect light” and “keep soil moist,” but they rarely mention how precise you need to be. This plant is a native of the deep, humid understory of Southeast Asian jungles—places where humidity never dips below 70%, temperatures stay steady, and light is filtered through thick leaves. Trying to mimic that indoors is tricky because even small shifts cause stress: brown edges, leaf curl, or yellowing.
At first, I thought misting alone would solve the humidity issue. Nope. After three weeks of religious daily misting—and watching those leaf edges turn crispy—I had to admit it wasn’t enough. Switching to a small ultrasonic humidifier placed about a foot away made all the difference. Within two weeks, my plant’s leaves regained their velvety softness. Lesson? Misting dries too fast in most homes to keep humidity where it counts.
The Care Routine That Actually Works (My Data-Backed Approach)
1. Measure Your Light with a Lux Meter — Don’t Guess
I bought an Extech LT300 lux meter after repeatedly burning leaves from afternoon sun that felt “filtered enough” by curtains. For Alocasia Maharani, aim for 2,000–3,000 lux throughout the day—no more, no less. I was shocked to find my south-facing window hitting over 6,000 lux at peak hours! Moving the plant back just a few feet or behind sheer curtains stopped burns almost overnight.
Quick tip: Hold the meter at leaf level and check multiple times during the day to get an average.
2. Soil Mix: Moisture Perfected
After testing six different mixes, I landed on this blend:
- 40% peat moss (for moisture retention)
- 30% perlite (for drainage)
- 20% orchid bark (for airflow around roots)
- 10% activated charcoal (to fight root rot)
This combo keeps soil evenly moist but not soggy—which is key because overwatering killed one of my plants in just 10 days (I learned that lesson painfully). Water only when the top inch feels dry; for me, that’s every 7–9 days in spring/summer.
3. Humidity Is Non-Negotiable
My apartment’s humidity dips below 40% in winter without help—and that wrecks this plant fast. Pebble trays and grouping plants didn’t cut it for me; only a consistent cool-mist ultrasonic humidifier kept humidity steady between 65–75%. The soft hum became background noise—totally worth it for those healthy leaves.
4. Keep Temperature Stable—No Drafts Allowed
Fluctuations are silent killers here. One summer night mistake was placing mine near an AC vent; within days, leaves curled sharply like paper. Now I keep it where temps stay between 68–75°F and avoid any direct airflow from vents or windows.
5. Fertilizer: Go Easy
I used to think heavy feeding helped growth—wrong again! Using diluted balanced liquid fertilizer (20-20-20) at half strength every 4–6 weeks during active growth worked best for me. Overdoing it caused leaf tip scorch that looked like tiny chemical burns.
Real-Life Stories That Show What Matters
-
Case #1: A friend’s Alocasia kept dropping leaves despite following watering advice exactly. We measured light together and found it was hitting over twice its max tolerance in afternoon sun—over 6,000 lux! Simply moving it behind sheer curtains stopped leaf burn immediately.
-
Case #2: Another grower dealt with brown edges despite daily misting and pebble trays. Adding a dedicated humidifier boosted ambient humidity by about 25%. Three weeks later? Brand new flawless leaves emerged without a single brown spot.
Common Mistakes I Made (So You Don’t Have To)
- Trusting misting alone for humidity—it evaporates too fast indoors.
- Guessing light intensity instead of measuring with a lux meter.
- Using generic potting soil that stayed soggy and caused root rot.
- Placing near drafts or AC vents during temperature swings.
- Overfertilizing because more seemed better (it’s not).
How to Use a Lux Meter — A Quick Guide
If you’re new to lux meters like I was:
- Turn on your meter and hold it at your plant’s leaf height.
- Take readings at different times during the day (morning, noon, afternoon).
- Aim for consistent readings between 2,000 and 3,000 lux for Alocasia Maharani.
- If readings spike above that—even through curtains—adjust placement accordingly.
It sounds technical but becomes second nature once you try it!
My Favorite Moment With My Alocasia Maharani
After six weeks of fumbling through mistakes and adjustments, I’ll never forget running my fingers along those deep green velvet leaves with their metallic shimmer under morning light—it felt like touching something almost otherworldly. That moment made every struggle worth it.
Putting it all together:: Your Next Steps to Thriving Black Velvet
- Get a lux meter to measure light precisely.
- Invest in an ultrasonic humidifier plus a humidity monitor.
- Mix your own soil with peat moss, perlite, orchid bark, and charcoal.
- Water only when top inch feels dry; avoid soggy soil.
- Keep temps steady between 68–75°F; avoid drafts.
- Fertilize sparingly with diluted balanced fertilizer every month or two.
Think of your Alocasia Maharani less as just a plant and more like a mini tropical ecosystem in your home—a demanding but deeply rewarding companion once you get its rhythm down.
You will mess up sometimes—that’s okay! The key is learning from those mistakes quickly so you can enjoy those stunning velvety leaves fully alive and thriving.
If you want more tips or have questions about any step, don’t hesitate to ask—I’ve been there!
Feel free to bookmark this or share with fellow plant lovers who want their Black Velvet shining bright without the guesswork headaches!


