Optimal Soil Types and pH Levels for Growing Healthy Italian Parsley

Soil prep for Italian parsley doesn’t have to feel like a science fair project. I promise, you don’t need fancy gadgets or a textbook. Most gardeners (myself included, many parsley patches ago) get bogged down by all the expert chatter about “precise aggregates” and “soil structure modifiers.” Honestly? A simple, hands-on approach works wonders—and I’ve seen it save more herb gardens than any soil analysis spreadsheet!
Let’s bust the myth: Loamy perfection is NOT out of reach
Let me take you back to my first year trying Italian parsley. I’d read so many articles warning me how fussy parsley is with soil… I spiraled into over-complication. There were measuring spoons for sand, moon cycles for compost turning, and at least three contradictory pH opinions from gurus online.
In reality? My friend Julia—a total garden newbie—planted hers in leftover tomato bed soil with two shovelfuls of leaf litter worked in and called it done. Hers grew twice as bushy as mine! That’s when it clicked: nature prefers practical effort over perfect theory.
Here’s what actually matters:
1. The “Grab-and-Squeeze” Test—Your Fast Track to Good Soil
You don’t need a microscope—just your hands! Grab some moist (not muddy) earth:
- Falls apart like dry cake mix? It’s sandy.
- Squeezes into a clump that sticks like play-dough? That’s clay.
- Holds shape briefly, then gently crumbles? You’ve hit loam gold!
If yours isn’t quite there—no sweat! Spread an inch or two of whatever compost or decomposed organic matter you have on top, then lightly mix it in. Done. The garden pros may debate ratios all day; real-world parsley just wants breathable roots and gentle nutrition.
Pro-tip: container gardener? Just use any bagged veggie/herb potting mix from the local store. Almost all are designed to mimic this magical crumbly loam.
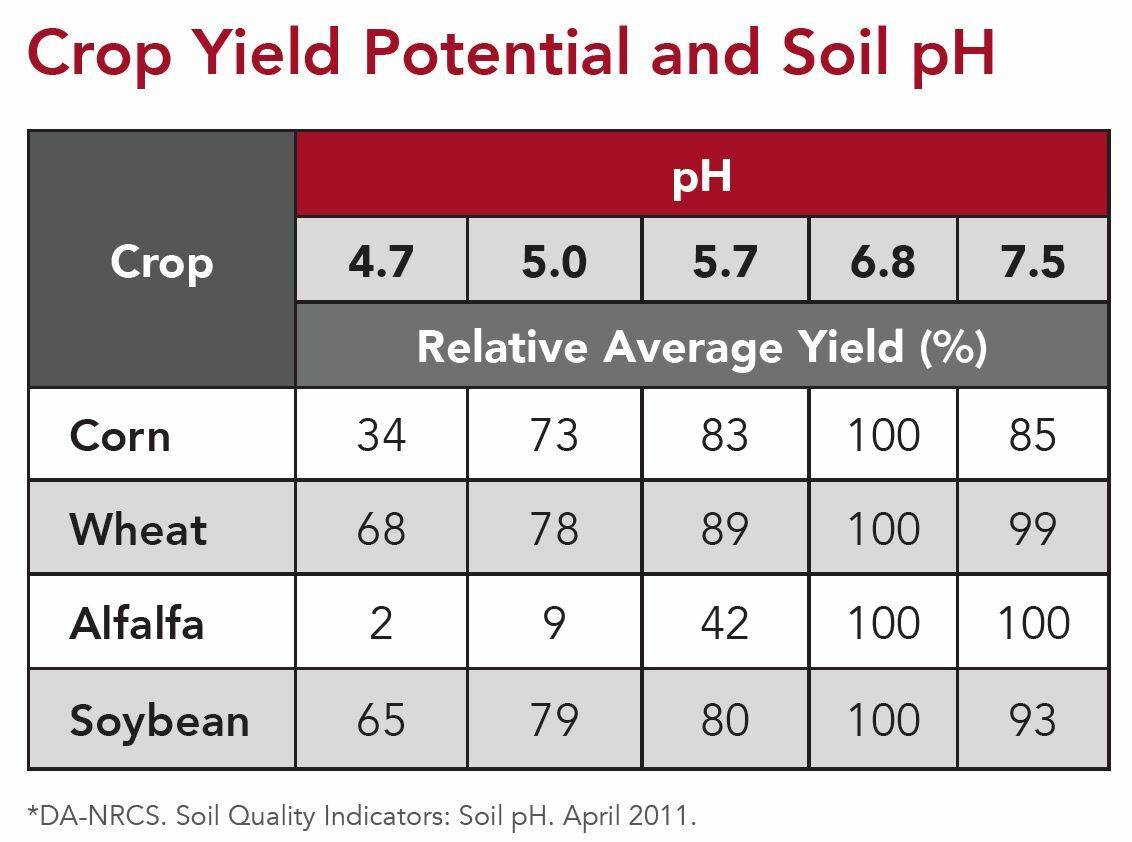
2. pH—Don’t Overthink It!
You’ll find endless debates about exact numbers—but keeping your soil between 6.0 and 7.0 gives parsley full access to nutrients. Here’s how I learned not to stress: a $10 home test kit gives you a ballpark measure in five minutes flat (I usually do mine right at the kitchen table).
Too low (acidic)? Sprinkle on some pulverized garden lime at planting time.
Too high (alkaline)? Work in peat moss or even used coffee grounds if that’s what you’ve got handy.

A quick story: Once, my raised beds crept up to pH 7.6 after several years watering with hard tap water (I live where limestone rules). I simply started mixing in a handful of pine bark mulch every season—and within months, my parsley perked up without any spreadsheet formulas.
3. Compost is the Real Miracle Worker
Ignore elaborate fertilizer schedules; year after year the best results in my own garden came from just working an extra inch of compost into each bed before sowing seeds. Not only does this feed the plants—it keeps your soil fluffy and easy-to-work season after season.
Here’s a trick inherited from my grandmother: To keep her herbs lush, she tossed last autumn’s shredded leaves directly onto her beds over winter—doubling as mulch and slow-release fertilizer by springtime.
4. Real Failures = Your Best Lessons
I’ll let you in on my disaster moment: Year two, feeling bold after early success, I planted straight into what looked like beautiful black dirt but was actually compacted clay underneath a thin top layer. Result: stunted seedlings crying out for help mid-June.
How did I fix it? Dug deep with a pitchfork, added sand plus more compost than seemed reasonable, and mixed until it felt like soft cake batter—not bricks! Next crop? Thriving jungle-green leaves all summer long.
5. Don’t Forget Simple Maintenance
Instead of tilling every year (which can wreck soil structure), just layer another inch of compost or leaf mold every spring, rake gently between plants to fluff things up if they look crusty—and step beside your patch instead of tromping right through it!
Every second or third year grab that little test kit again—or simply watch if parsley starts looking yellowish or puny despite solid watering habits; often that means something subtle shifted in your garden chemistry.
Quick Action Plan—For IMPATIENT Gardeners Like Me!
- Hands-on soil squeeze today
- Quick home pH check this week
- Add whatever compost/mulch/leaf litter you’ve got
- Sow those seeds or transplant starts—all done!
No rulebook needed; Italian parsley bounces back fast when you give roots soft earth and open access to food and water.
Bottom line: The experts’ ultra-precise advice sounds impressive—but even beginners can grow lush Italian parsley with just three tools: their hands, compost bin (or bag), and five spare minutes for testing once or twice per season.
Let go of “perfect” technique—gardening should be fun and forgiving! You’ll be slicing fresh sprigs onto pasta before you know it… and probably teaching those same experts a thing or two about keeping things simple next season!


