Bokashi Composting Explained: A Data-Driven Guide to Efficient Waste Recycling
If you’re tired of composting advice that feels like it was copied from the back of a fertilizer bag, let’s change that. I’ve spent years troubleshooting failed piles, battling apartment odors, and running headlong into every mistake—so you don’t have to. Bokashi composting isn’t just another method; it’s a complete system for closing your food loop with maximum efficiency and minimal hassle. And if you want true mastery—in less time than it takes to binge-watch a season of your favorite show—let me walk you through not just what works, but why, when, and how to fine-tune every step.

Bokashi Mastery: The Complete System (Shortcuts & Advanced Tactics Included)
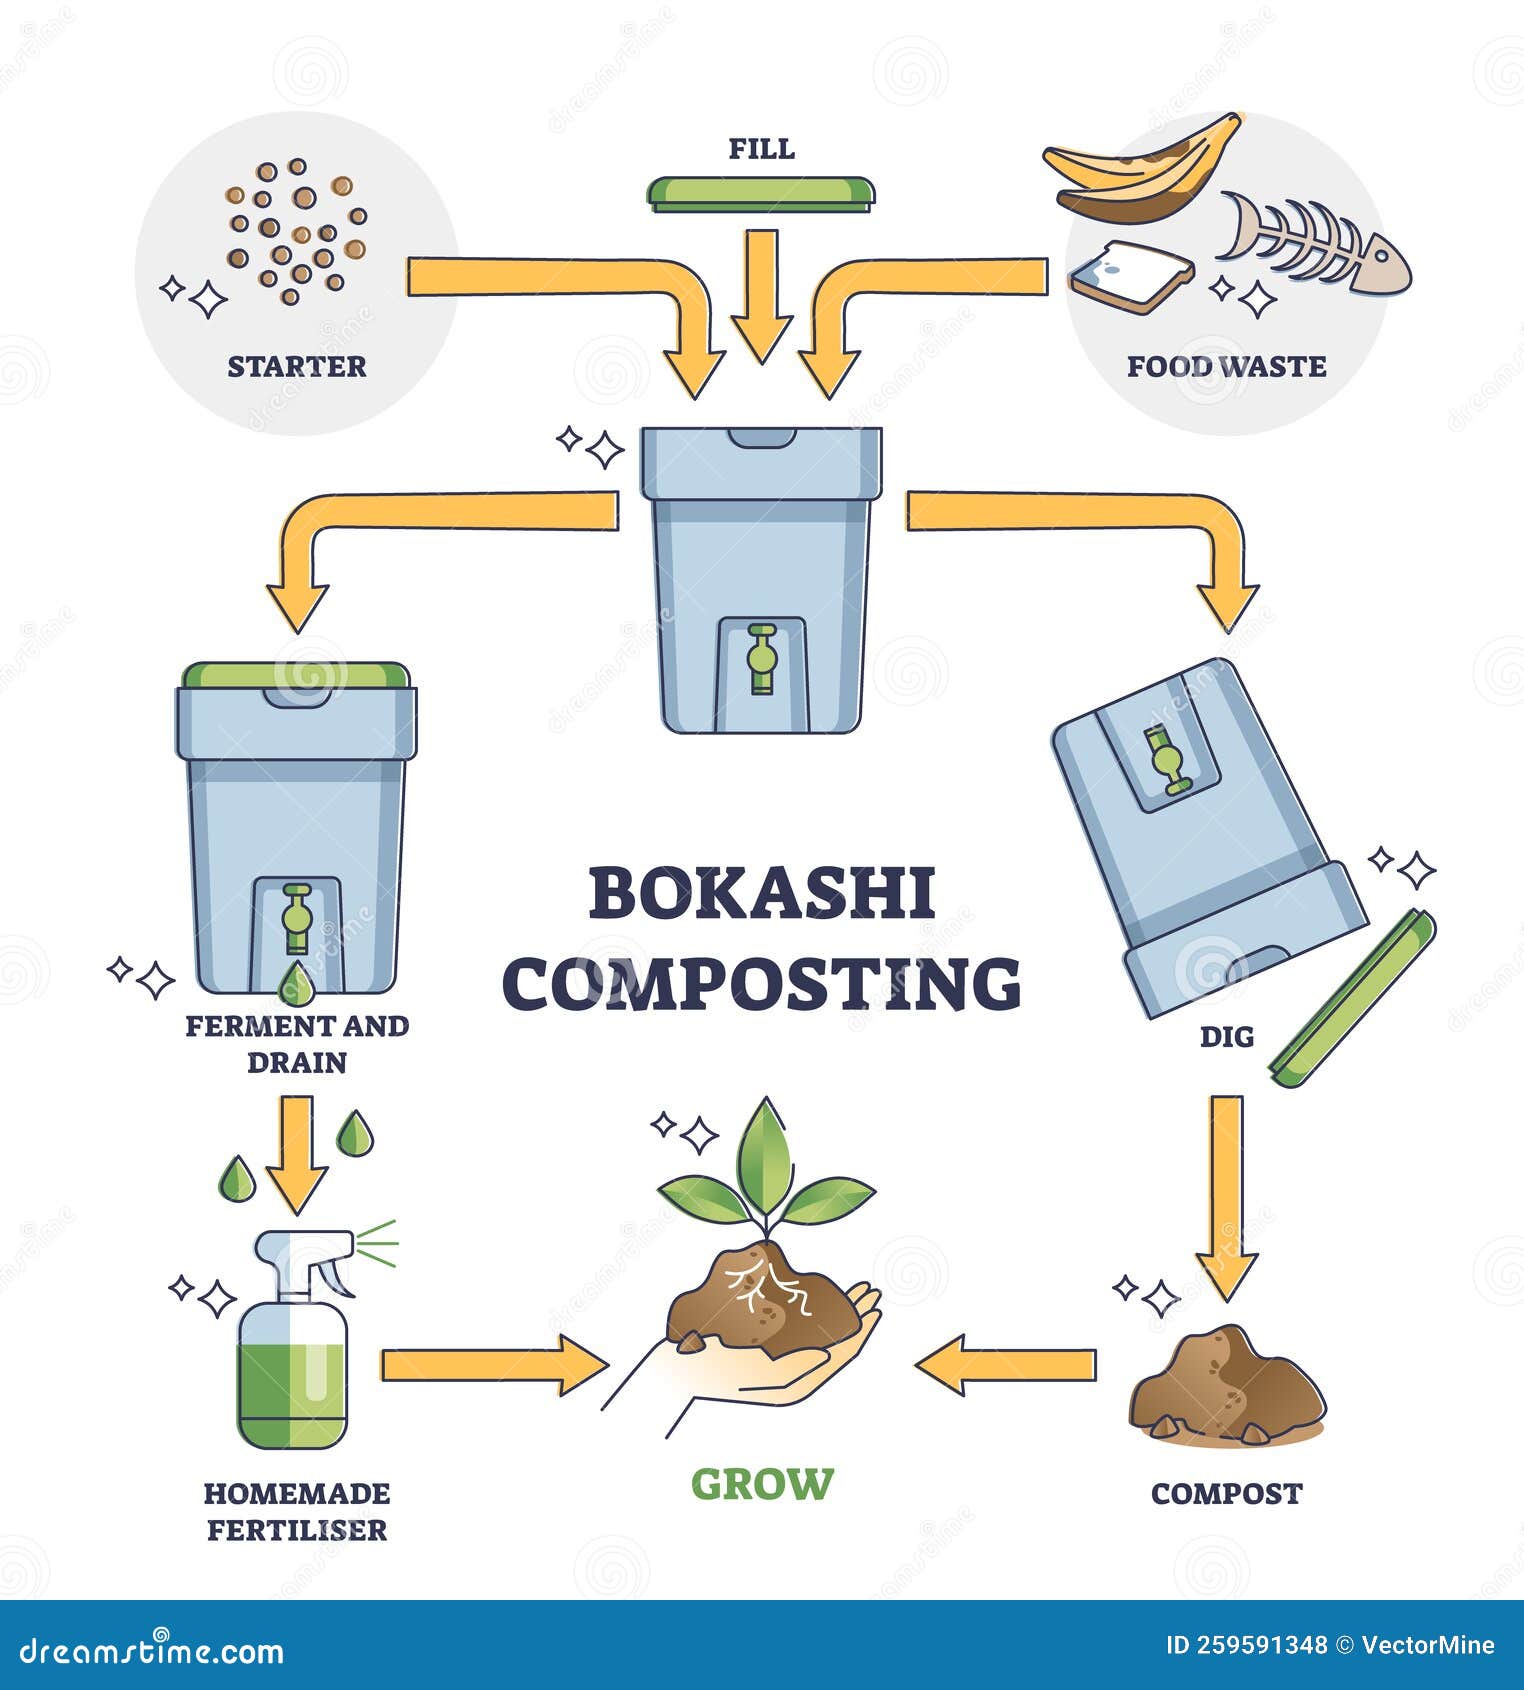
1. Why Bokashi? Understanding the "Systemic" Difference
Most guides skim over the science or sell you on “no smell” promises. But here’s the reality: Bokashi is engineered for urban dwellers and control freaks who need results—fast.
The core insight:
Bokashi isn’t pure decomposition—it’s fermentation (think kimchi or sauerkraut for your leftovers). You’re not waiting for nature; you’re hijacking it with an army of microbes custom-built to outcompete rot.
- All-in: You can add meat, cheese, bread crusts—even that failed curry experiment.
- No pile-turning: There’s no back-breaking labor or weekend chores.
- Pest-proof: Done right, pests can’t even find their way in.
- Minimal odor: At worst, a tangy pickle note—not putrid landfill reek.
Back in 2018, after my third maggot-infested worm bin disaster in my tiny studio kitchen, I stumbled across bokashi at a gardening workshop. Within two cycles—about six weeks—I was getting usable soil amendment with zero fruit flies and half the effort. That was when I realized traditional composting had been wasting my time. If you’re curious about how bokashi stacks up against classic methods, I break down the pros and cons of bokashi vs traditional composting here.
2. System Setup: What You Actually Need (And Where to Cheat)
Forget shopping lists that push $100+ kits if you’re just testing the waters—or DIY hacks that ignore liquid management (the #1 failure point). Here’s my tested setup by scenario:
For Beginners (Apartment or Small Space):
- Two airtight 5-gallon buckets, one with a $6 Gamma Seal Lid from Home Depot (game-changer for one-handed opening/closing).
- One spigot kit (~$7 online) OR use turkey baster + tilt-bucket hack for leachate removal.
- Store-bought bokashi bran, at least 2kg (enough for two full cycles).
If you want a more detailed walkthrough on getting started, check out my beginner’s guide to starting bokashi composting at home.
For Power Users / Families:
- Three bins in rotation (one filling, one fermenting, one empty/cleaned).
- Homemade bran savings: $30 per year if making your own vs retail.
- Optional: Digital kitchen thermometer to monitor fermentation temp (aim for 18–24°C/64–75°F sweet spot).
Shortcuts:
- Freeze meats/fats until enough accumulates for a single layer—reduces mold risk and makes packing easier.
- Pre-chop waste Sunday nights while meal-prepping; smaller pieces = faster fermentation + more capacity per bucket.
3. The Advanced Step-by-Step Playbook
Standard guides gloss over details; here’s where most first-timers go wrong—and how to shortcut around them:
Stage One: Fermentation
- Prep Bin:
- Layer bottom with napkin/paper towel + sprinkling of bran as “starter bed.”
- If using DIY buckets without mesh insert above spigot hole, wedge a mesh produce bag at base—stops clogging.
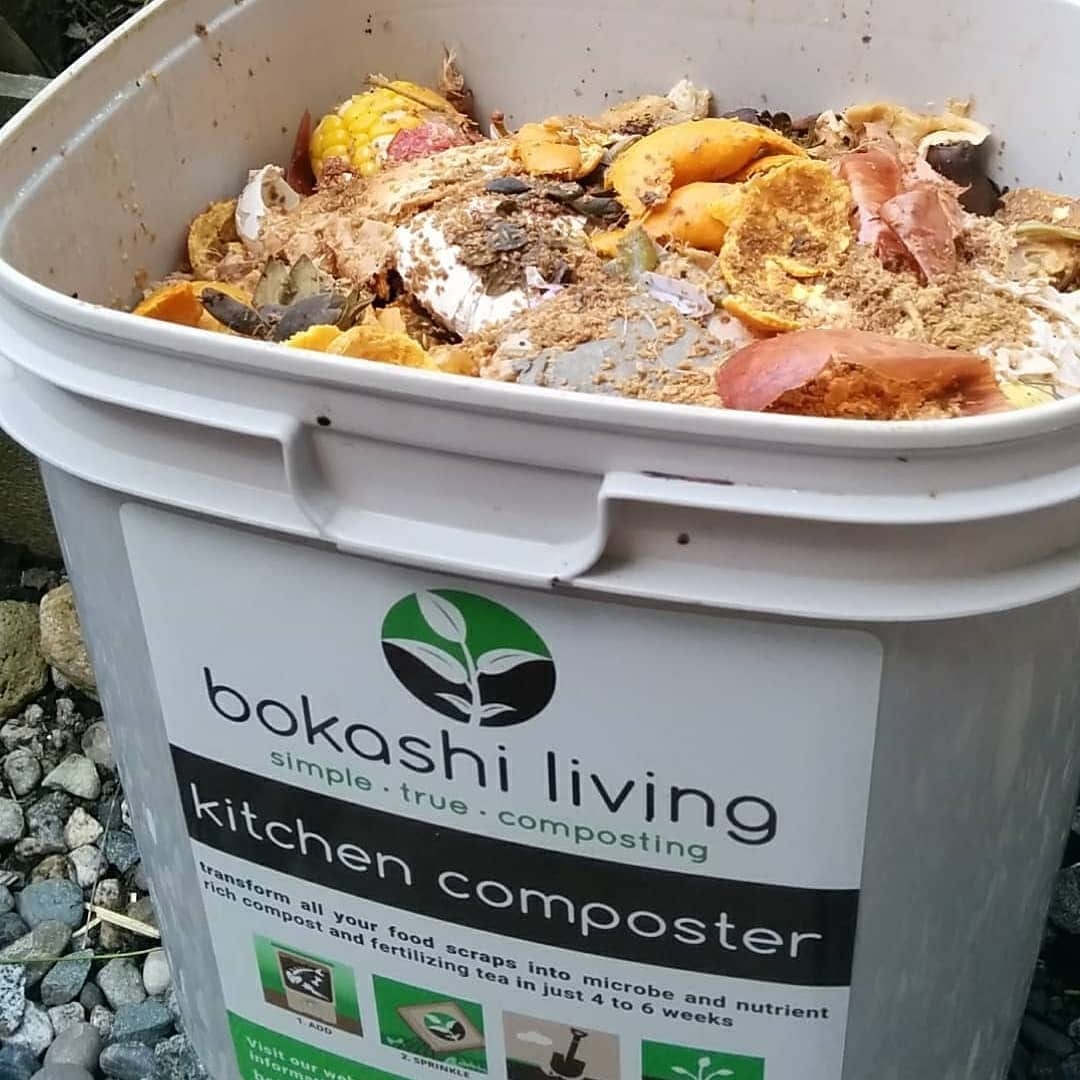
- Add Waste Daily:
- Chop scraps under 2” (5cm) whenever possible—blenders are fair game if rushed!
- Layer food waste in evening only; fewer lid openings means less air intrusion = better fermentation.
- Each new layer gets generous dusting of bran (~¼ cup per inch), but double this on meat/dairy days.
- Compact & Seal:
- Use potato masher or flat-bottomed glass jar; really press down until surface glistens slightly with moisture.
- Run finger along rim before sealing each night—a missed crumb invites gnats!
- Leachate Management:
- Drain every three days minimum—even if container looks dry up top; hidden pockets build up fast.
- Use diluted leachate immediately within 24 hours or risk foul bacteria bloom; mark your calendar/app reminders!
- Ferment Fully:
- Once full, sprinkle extra bran on top (“insurance layer”), then seal tight and label date (“open after MM/DD”).
- Store somewhere between fridge-warm and sweater-cool—not next to radiators or A/C vents.
Stage Two: Soil Integration
This is where most people botch it by dumping everything in one spot...and returning weeks later to disappointment.
- Scout Site:
- Look for partial shade spot if possible—soil microbes work best without sun baking them dry.
- For balconies/no yard? Use large Rubbermaid tote + garden soil mix as temporary “finisher.”
- Trench Method:
- Dig trench ~12” deep (~30cm); spread fermented waste evenly along bottom—don’t clump!
- Backfill with existing soil + water lightly.
- Mark spot on calendar AND physically (“popsicle stick flag,” trust me—you’ll forget otherwise).
- Pot Integration Shortcut:
- For city dwellers: Mix pre-compost into bottom third of planters before planting tomatoes/peppers/herbs—the plants go wild once roots hit the stuff after ~3–4 weeks.
If you want more guidance on maximizing bokashi’s benefits in your garden, you’ll love these application tips for using bokashi compost in your garden.
4. Common Pitfalls—and My Fixes
After coaching dozens through their first bins:
Mistake #1: Skimping on Bran
I tried using half doses once to save money—the bin went blue-green by day eight and stank so badly my roommate threatened mutiny.
Fix: Always err on more bran than less until you’ve dialed in your local microbe balance.
Mistake #2: Forgetting Leachate Draining (or Not Having a Tap)
My first DIY bucket flooded after two weeks—the bottom turned black and mushy because I skipped draining.
Shortcut fix: If caught late, transfer contents quickly into new bin lined with fresh newspaper + double dose bran; salvage what you can!
Mistake #3: Expecting Finished Compost Straight from Bin
A friend dumped straight-from-bokashi onto her basil pots...and nuked them dead within days due to acidity overload.
Advanced tip: Always finish pre-compost IN SOIL before planting anything edible!
If you run into weird smells, mold, or leachate issues, don’t panic—my comprehensive troubleshooting guide for bokashi composting covers all the most common problems and fixes.
5. Level-Up Moves Most Guides Won’t Tell You
A) Make Your Own Supercharged Bran—for Pennies
By year two I cut costs by fermenting wheat bran myself:
- Mix EM1 solution ($10/liter lasts months), molasses ($4/bottle), warm water;
- Add enough bran so final mix is damp like wrung-out sponge;
- Pack tightly into ziplock bags; squeeze out air;
- Ferment at room temp two weeks—you’ll know it’s ready when bag swells slightly and smells like bread beer;
- Air-dry thoroughly before storing up to six months;
Personal twist? Add spent coffee grounds or rice hulls for extra microbe “food”—plants seem noticeably happier!
B) Zero-Waste Winter Hack
In cold climates without diggable ground:
- Stash full bokashi bins sealed tight outdoors/in basement until spring thaw—they’ll keep fermenting slowly but safely;
OR - Buy cheap potting soil bags at hardware store end-of-season sale ($2 each); layer bokashi mix inside bags over winter indoors = instant microbe bomb come April!
C) Integrate With Worm Bins Without Killing Your Worms
Worms hate acid—but they LOVE pre-digested food:
Start slow! Mix small handful of finished bokashi pre-compost into edge of worm bin once per week max at first; ramp up only as worms adapt over several cycles.
Pro tip? Stir in crushed eggshells or oyster shell grit beforehand—it buffers pH spike so worms stay happy.
6. Real Life Scenarios – How This Works In Practice
Let me share some direct dialogue from clients who’ve become converts:
“Is this normal?” — text from John after his first week when he noticed white fuzz atop his bokashi layer.
“Yes! That fuzz is actinomycetes—a beneficial fungus that signals healthy fermentation.”
Or Lisa’s trial-by-fire:
She forgot about her leachate tap during vacation week…came home to brown sludge leaking across her laundry room floor (“smelled like gym socks dipped in vinegar”). Now she sets Alexa reminders every three days—and hasn’t had an issue since.
In my own garden last summer:
After integrating four months’ worth of bokashi under new raised beds in May, tomatoes grew twice as tall as control beds—and produced nearly double the fruit weight by August (measured side-by-side).
7. Troubleshooting Table – Fast Solutions at a Glance
| Symptom | Likely Cause | Rapid Fix |
|---|---|---|
| Sour/vinegar smell | Normal | Celebrate! |
| Putrid/sulfur smell | Not enough bran/leachate | Add more bran/drain immediately |
| Blue/green mold | Excess air/wrong microbes | Remove affected portion/add fresh bran |
| Liquid overflow | Missed draining | Mop up/transfer contents asap |
| No access to outdoor soil | No land/community option | Use potting mix layers/tote method |
8. Mastery Calendar – From Zero To Hero In Six Weeks
Here’s my personal cycle breakdown—from scratch batch to thriving plants:
Week 1–2:
Start collecting scraps nightly → add daily layers/brans → compress/drain every three days → keep strict lid discipline
Week 3–4:
Bin fills up → final layer/brans added → set aside dated/sealed → start second bin while first ferments (“bucket leapfrog”)
Week 5–6:
Open fermented bin → bury/trench outdoors OR blend into indoor tote/pots → observe white mold/plants’ rapid uptake within days!
Ongoing:
Repeat cycle endlessly; tweak based on seasons/capacity/odors detected;
Cheat code?
If life gets hectic mid-process—just pause filling bins until things settle; nothing spoils quickly if left sealed cool/dark!
Final Word – Consistency Trumps Perfection
True mastery doesn’t mean never making mistakes—it means building feedback loops so errors become learning fuel rather than roadblocks.
Bokashi transforms kitchen drudgery into visible garden results—with fewer steps than any other system I’ve tested across five cities and ten apartments over twelve years.
Give yourself permission to experiment boldly—even if your first attempt ends up sludgy or weird-smelling.
The shortcut is experience itself.
So grab whatever airtight container fits under your sink,
order/mix your very first batch,
set those calendar reminders now,
and get ready:
You’re not just keeping banana peels out of landfills—
You’re closing loops,
feeding future tomatoes,
and proving real zero-waste living happens plate by plate,
bucket by bucket.
When friends ask why your houseplants explode with growth?
Just smile…and hand them some homemade bokashi starter.
Questions? Send them my way—I’ve likely troubleshot it already.
Happy fermenting—and welcome to mastery!


