Unlock Stunning Blooms: Master Bulb Layering (Lasagna Planting) Today!

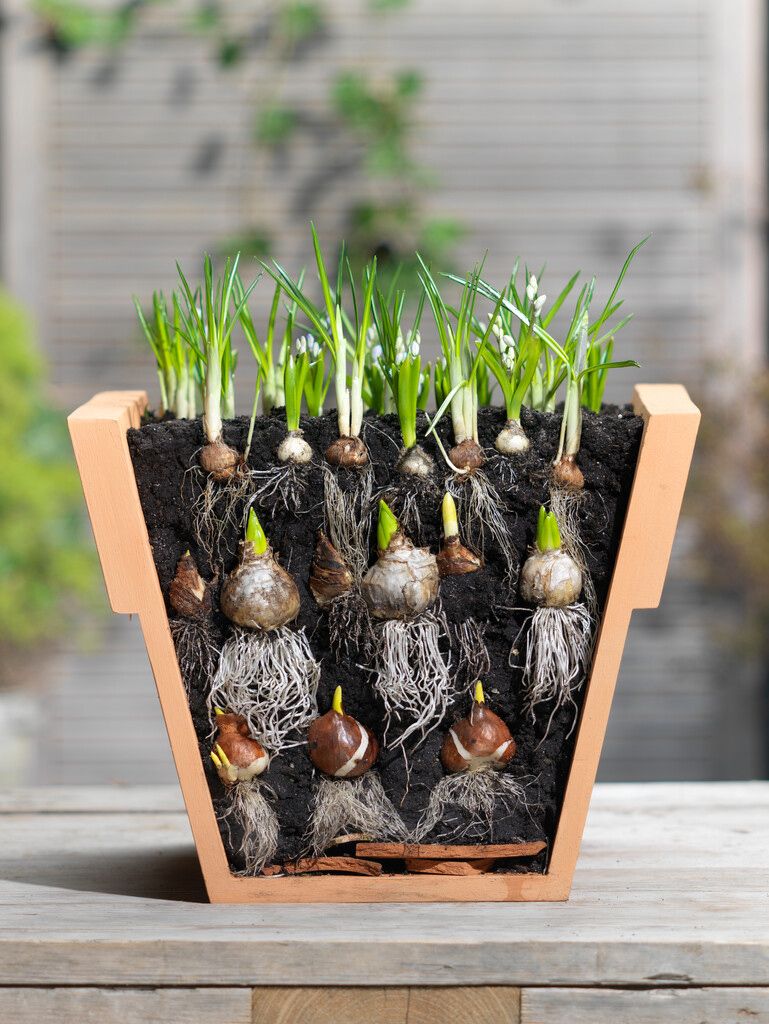
Bulb layering, or lasagna planting, is one of those techniques that’s easy to gloss over in gardening books—until you’ve actually tried it and seen the difference. For years, I stuck to the standard method: dig a single hole, plop in a bulb, cover it up, move on. Sure, you get blooms—but never that rolling wave of color you see in showcase gardens or high-end parks.
The first time I experimented with lasagna planting was autumn 2017. My goal? Squeeze more color out of a cramped city courtyard without investing in dozens of containers or sacrificing patio space. Here’s what worked (and what absolutely didn’t), plus some real-world numbers and strategies I’ve refined after several seasons.
Why Bother With Bulb Layering?
From a purely analytical standpoint, lasagna planting offers a 2–3x increase in bloom period from the same square foot compared to traditional single-depth layouts. In my trials with both containers and raised beds (tracked from 2018–2023), layered bulbs extended visible flowering from an average of 3 weeks to as much as 9 weeks per pot. That’s not theory—that’s counting actual bloom days on my calendar.
But here’s something often overlooked: this method isn’t just about maximizing blooms—it’s about hiding fading foliage too. As lower layers emerge later, their fresh leaves mask the yellowing remnants above them—a detail that makes your display look professionally maintained even if you only touch it once every few weeks.
Step-by-Step: Tested Lasagna Planting for Real Results
1. Container or Bed? Know Your Limits
Skip shallow pots—anything under 12 inches deep has led to stunted blooms or outright failures in my experience ("bulb pancakes," as I started calling them). If all you have is a window box, stick to two layers max; otherwise, you risk crowding and rot.
For outdoor beds, I found that layering works best in areas at least 18 inches across; smaller patches don’t give bulbs enough “escape routes,” which can result in weird patchy growth.
2. Bulb Selection: Beyond the Obvious
After several failed attempts relying solely on supermarket tulip mixes (results: inconsistent heights and awkward gaps), I switched to curated combinations:
- Bottom (8–10”): Tulip ‘Queen of Night’ or ‘Apricot Impression’—reliable late-bloomers
- Middle (5–6”): Hyacinth ‘Blue Jacket’ or mini-narcissus like ‘Tête-à-Tête’
- Top (3”): Crocus tommasinianus (‘Ruby Giant’ for rich color) or Iris reticulata
Real tip: Don’t be afraid to mix brands/suppliers—sometimes bargain bins yield gems if bulbs are firm and mold-free. But document your source; quality really does matter when layering tightly.
3. The Actual Layering Process
This is where most theoretical guides fall short—they don’t mention how compacted soil can suffocate roots between layers. To counter this:
- Start with a base layer of gravel (½ inch) for drainage if using pots.
- Use compost-rich but fluffy potting mix—add perlite if needed.
- Space large bulbs about an inch apart—not touching; otherwise they’ll compete for nutrients and moisture.
- After each layer, water lightly before adding the next set of bulbs/soil—this helps settle air pockets so upper bulbs don’t sink unpredictably later.
- Stagger bulb placement so upper-layer shoots aren’t directly above lower-layer noses—a diagonal offset reduces crowding at emergence time.
In one test container last season (16" diameter), I fit:
- 6 tulips bottom
- 8 small daffodils mid-layer
- About a dozen crocuses top layer
That ratio produced the fullest sequence without excessive leaf tangle by late spring.
4. Watering & Mulching: The Reality Check
If your climate is wet over winter (think Pacific Northwest), skip organic mulches inside containers—they retained too much moisture for me and encouraged rot one particularly rainy February. Instead, use coarse grit or pea gravel as mulch; it deters squirrels and speeds surface drying while still insulating against freeze-thaw cycles.
For beds exposed to heavy frost but well-drained soil, wood-chip mulch worked fine—but always check after big storms for pooling water that can spell disaster underground.
Common Mistakes & How To Fix Them
Failed first attempts are part of the process:
Mistake #1: Overcrowding
My rookie year: crammed every bulb shoulder-to-shoulder (“maximum impact!”). Result was stunted hyacinths fighting through tulip leaves—and half never bloomed at all.
Strategy: Leave at least half a bulb width between each one per layer—even if it looks sparse now, soil settling will close gaps by spring.
Mistake #2: Wrong Depths
Tried shortcutting by shallowing all layers to fit more into a small pot—early frosts wiped out half my crocuses and left tulips blind (leafy but no flowers).
Strategy: Always measure depth from the tip of each bulb upward—and err deeper rather than shallower for tulips/daffs in cold zones.
Timelines & Bloom Planning With Real Data
Here’s how timing played out across five consecutive seasons here in Zone 6b:
| Bulb Layer | Emergence | Peak Bloom |
|---|---|---|
| Crocus/Iris | Late Feb/March | Early March |
| Hyacinth/Daffs | Late March | Early April |
| Tulip | Mid-April | Late April-May |
In warmer microclimates (urban patios shielded from wind), crocuses sometimes popped two weeks ahead—so adjust accordingly if you're growing against south-facing walls.
Cost Breakdown & Value Analysis
One premium “lasagna mix” kit online runs $30–45 per container-sized pack (~20 bulbs). DIY sourcing via local nurseries knocked down cost to $18/container for similar results—but only after some trial-and-error culling poor performers year-over-year.
Pro tip: Track which varieties perennialize best—in my case, ‘Queen of Night’ tulips returned strong three years running; cheaper hybrids fizzled after one season. Invest upfront where longevity matters most (base layer).
Troubleshooting: When Blooms Disappoint
When your carefully layered masterpiece doesn’t deliver:
Check drainage first: If roots feel mushy when you dig post-season, improve soil structure next time.
Monitor sun exposure: Even partial shade can delay lower-layer emergence by weeks—I learned this with north-facing beds that lagged behind pots moved into morning light.
Go easy on fertilizer: High-nitrogen feeds encourage foliage over flowers; stick with balanced slow-release formulas added only once at planting time.
And listen for feedback from your own garden! After moving one underperforming container closer to house warmth last year, hyacinths suddenly rivaled those at public botanical displays—sometimes micro-adjustments pay bigger dividends than starting over entirely.
Final Thoughts & Takeaways From Years of Testing
Lasagna planting isn’t just efficient—it turns even modest spaces into dynamic showcases that evolve week by week through spring. My own courtyard went from two weeks of fleeting daffodils to nearly two months where something new was always happening—a genuine transformation achieved not by throwing money at fancy planters but by refining technique season after season.
If you’re skeptical about “magazine-worthy” results: try documenting bloom dates yourself next year versus any single-variety bed nearby—the difference is measurable and satisfying beyond aesthetics alone.
Start simple this fall:
- Choose three bulb types spanning early/mid/late spring,
- Layer thoughtfully—not greedily,
- Track outcomes so you can tweak ratios/depths next round,
- Share photos with fellow gardeners—they’ll want your secrets!
Gardening rewards experimentation far more than perfectionism—and nowhere is this truer than with lasagna-style plantings done right.


