Common Pests and Diseases on Alocasia Polly and How to Heal Them

Quick Start: Your Alocasia Polly Rescue Checklist
If you’re new to this plant or need a refresher, check out this comprehensive guide to Alocasia Polly plant care for detailed background on its needs and growth habits.
- Inspect every leaf (especially undersides) for tiny bugs, webs, or fuzzy spots.
- Remove badly damaged leaves with sterilized scissors.
- Wipe leaves down gently with diluted neem oil (2 tbsp neem oil + 1 quart water) on a soft cloth every 3–5 days.
- Only water when top inch of soil is dry—usually about once a week indoors.
- Boost humidity to 60–70% using a humidifier or pebble tray.
- Keep air flowing gently with a small fan nearby.
- Quarantine sick plants until all pests are gone (at least two weeks).
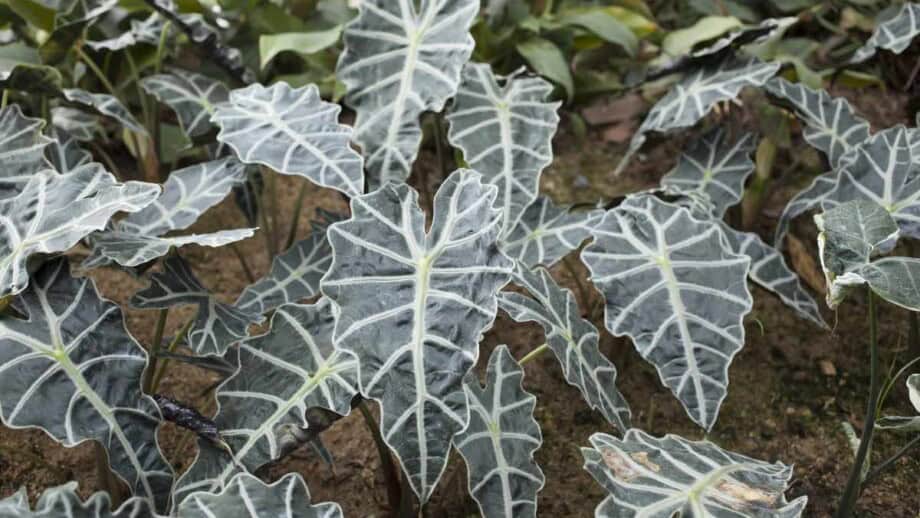
When I first got my Alocasia Polly, those arrow-shaped leaves were stunning — but within days, I spotted tiny yellow speckles and faint webbing underneath. Panic set in. Sound familiar? If you’re wrestling with bugs or leaf spots right now, you’re not alone. Let me share what I learned the hard way so you can save time and frustration.
For a complete overview of Alocasia Polly plant care, including ideal lighting and soil conditions, be sure to visit that resource as well.
Common Pests on Alocasia Polly—and How to Handle Them
Spider Mites:
These microscopic pests spin fine webs under leaves and cause tiny yellow or white speckles. They multiply fast and love dry air.
What worked for me:
- Instead of spraying blindly, I wiped each leaf’s underside with a microfiber cloth soaked in diluted neem oil (2 tbsp neem oil per quart of water).
- I repeated this every 3–5 days for nearly three weeks. It’s slow, but wiping physically removes eggs and breaks their cycle better than spraying alone.
Aphids:
Small green or black bugs that cluster on new growth and cause sticky residue.
Tip: A gentle wipe with neem oil solution plus rinsing the plant under lukewarm water usually knocks them back quickly if caught early.
Mealybugs:
Those fluffy white clumps hiding in leaf joints are tricky—they multiply like wildfire if ignored.
My toughest battle:
I stopped spraying and switched to dabbing each cluster carefully with cotton swabs dipped in 70% isopropyl alcohol every two days. Between those sessions, I sprayed neem oil lightly. Quarantining the plant helped prevent spread. After two weeks of this hands-on care, the mealybugs vanished.
Diseases You Might See—and What to Do
Root Rot:
If your leaves develop dark spots that don’t go away or start yellowing rapidly, check roots immediately. Overwatering or poor drainage often causes root rot—a silent killer.
How I fixed mine:
- Repotted into fresh soil mixed with 30% perlite and orchid bark for better airflow around roots.
- Watered only when the top inch of soil felt dry (about every 10 days during winter).
- Cut off all affected leaves promptly using sterilized scissors to stop fungal spores from spreading.
Healthy roots should be firm and white or tan — mushy, black roots mean trouble and need urgent repotting. For more on choosing the right growing medium, see best soil and fertilizers for healthy Alocasia Polly growth.
Humidity Matters More Than You Think
I used to think less moisture meant fewer problems; turns out that was backward. My Alocasia suffered crispy edges near the air vent blasting dry heat—and guess what? That made pests worse too.
Here’s the sweet spot: Alocasia Polly loves humidity around 60–70%, but it also needs good air circulation to avoid mold or fungus. To understand how to balance these factors, check out understanding light and humidity needs of Alocasia Polly plants.
What finally worked:
- Running a small ultrasonic humidifier nearby (cost me about $30).
- Placing the pot on a pebble tray half-filled with water—just enough moisture without soggy soil.
- Using a low-speed oscillating fan to keep gentle airflow.
This combo mimics its tropical home without creating stagnant conditions where bugs thrive.
Why Patience Beats Panic Every Time
I won’t sugarcoat it—treating these pests and diseases takes time and persistence. The first few weeks felt endless: wiping leaves carefully, checking roots, adjusting watering habits… But rushing into harsh chemical sprays just stressed my plant more than helped it.
Your Alocasia Polly is sensitive but resilient if you listen closely and respond consistently. It’s not just about killing bugs—it’s about creating an environment where your plant can bounce back stronger.
Troubleshooting Tips When Things Don’t Improve
-
Pests returning despite treatment? Look harder! Eggs hide deep under leaves or in tight stem crevices. Use a flashlight during inspections every few days for at least two weeks straight before relaxing your guard.
-
Yellowing leaves after pest control? It might be nutrition or root problems, not just bugs. Gently remove your plant from its pot to inspect roots — they should be firm and light-colored, not mushy or blackened.
Your Next Steps: Simple But Effective Care Habits
- Inspect thoroughly: Flip every leaf over; use good light to find pests early.
- Remove problem areas: Cut off badly infested/damaged leaves with sterilized scissors.
- Wipe down leaves: Use diluted neem oil on a soft cloth; physically remove bugs and eggs instead of relying on sprays alone.
- Water smartly: Only when the top inch of soil feels dry—don’t guess by schedules.
- Improve environment: Maintain steady humidity (60–70%) + gentle airflow.
- Quarantine as needed: Keep sick plants isolated until fully pest-free for at least two weeks.
Stick with this routine even if progress seems slow—you will see results!
Final Thought: Caring for Alocasia Polly Is a Journey
Honestly? Some days felt like losing battles—bugs would reappear despite my best efforts, or new issues popped up unexpectedly. But each challenge taught me to slow down, observe carefully, and treat my plant like a living partner rather than just another object to fix fast.
So if you’re feeling overwhelmed right now: take heart! Your patience will pay off in vibrant green leaves that almost glow again under your care.
Ready to roll up your sleeves? Your Alocasia Polly is rooting for you — literally — and together you’ll get through this tougher-than-it-seems phase stronger than ever!
If you want more tips on specific pest identification or homemade remedies that worked for me personally, just ask—I’m happy to share what saved my tropical gem!


