Cutting Garden Design: Practical Tips to Grow Beautiful Blooms Easily
Few experiences are as joyful as stepping outside, snipping a fistful of freshly grown flowers, and filling your home with color and fragrance that no store-bought bouquet can match. But if you’ve ever ended up frustrated with just a few sad stems—maybe some floppy marigolds and a lone zinnia—you know cutting gardens are more art than accident. They require a mix of patience, smart planning, and yes, some trial-and-error that gets easier (and more fun) every season.
This isn’t your ordinary “plant sunflowers and hope for the best” guide. It’s the distilled wisdom from years spent digging in my own backyard lab—testing varieties, adapting big-farm techniques to small spaces, and learning what actually gives you endless bouquets without turning into a full-time job.
If you want a cutting garden that fills both vases and your soul consistently, this is your playbook. Ready? Let’s get our hands dirty together.
1. Foundations: What Makes Cutting Gardens Different?
Walk through any typical flower bed, and you’re looking at plants carefully arranged for looks—not for harvesting. A cutting garden is the opposite: it’s all about production. Every bloom and stem grows with one goal—to be cut.
Why Does This Matter?
- Plant for harvest, not just display: Unlike a typical garden where picking flowers feels like ruining something beautiful, here each snip tells the plant “keep growing more.”
- Design layout for ease: Forget twisting paths or artful displays—straight rows or square blocks make picking quick and painless.
- Mix plants by function: Annuals bring fast color; perennials provide regular returns; bulbs fill early spring gaps; fillers add texture and bulk to bouquets.
- Focus on practical results: Your garden doesn’t need to look Instagram-perfect in July—it needs to be wildly abundant (even if messy).
- Maintain joyfully: Healthy soil and clever plant choices reduce tedious work so you spend more time harvesting than fixing problems.
Real talk: My first year I went full-on English cottage—with winding paths everywhere. Gorgeous… until I tried cutting anything. Seedlings trampled, stalks snapped, me crying. Straight rows may look “boring,” but trust me—they save tears.
2. From Dream to Dirt: How To Build Your First Cutting Garden
You don’t need acres or fancy training—just sunlight, soil, and willingness to experiment.
Step 1: Measure & Map Your Space
Don’t stress over perfect size. Here’s roughly what you can expect:
| Space | What You Can Harvest |
|---|---|
| Small 4x8’ Bed | 50–100+ bouquets over summer with succession |
| Five Patio Pots | Weekly small posies June–September |
| Fence Row (20 feet) | Enough sweet peas & zinnias for friends & family |
Tip: Walk around during different times of day; even partial shade spots can grow fillers or herbs—don’t discard space too quickly.
Step 2: Lock Down Soil & Sunlight
These two are non-negotiable:
- Sunlight: Most annuals need at least six solid hours of direct sun daily.
- Soil Prep: Please don’t skimp here! I once skipped compost on a new bed—cosmos barely grew, leaves yellowed fast... lesson learned the hard way.
How to prep:
- Buy an inexpensive soil pH kit ($10 at most garden stores); ideal range: 6.0–7.0.
- Mix in 2–3 inches of good-quality compost before planting.
- If water pools after rain, raise beds or blend in sand/leaf mold for drainage.
Personal note: The year I switched from generic shovel-dirt to real compost-rich loam was a game changer — my dahlias grew taller than my four-year-old!
Step 3: Pick Flowers Proven To Deliver
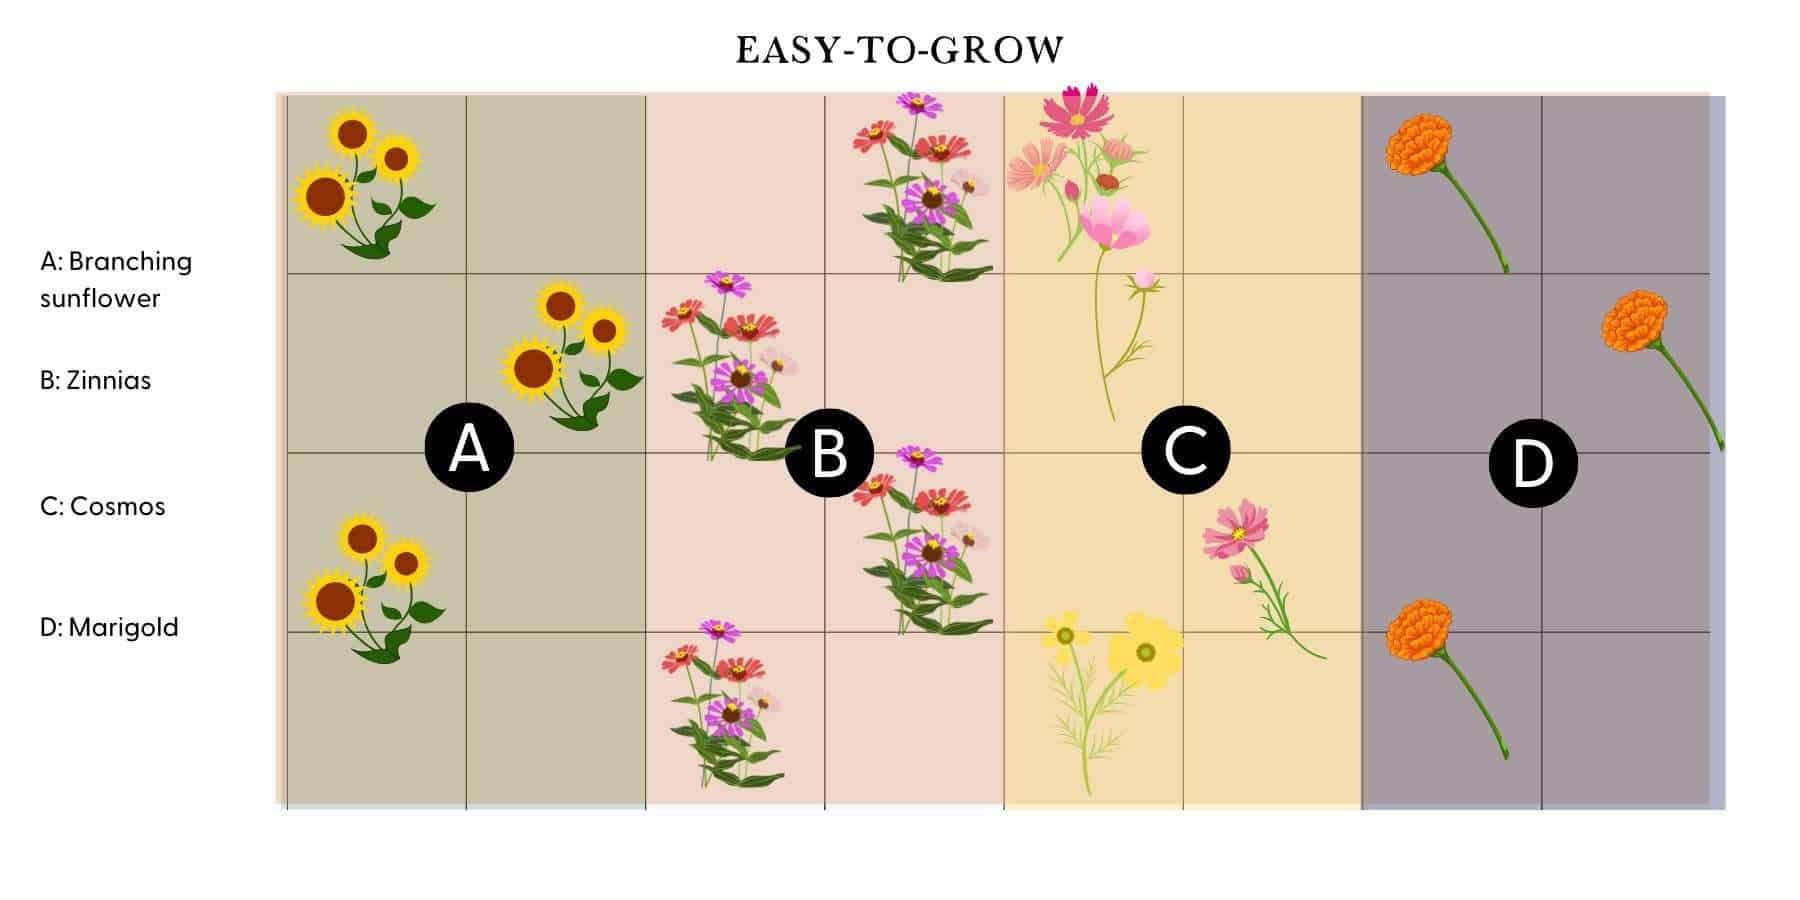
This is where beginners often get overwhelmed or go wild (guilty!). Here’s a balanced starter list:
Favorite Annuals:
- Zinnia ‘Benary’s Giant’ — robust stems + long vase life (up to two weeks)
- Cosmos ‘Double Click’ — airy yet focal; great filler
- Sunflower ‘ProCut Plum’ — pollenless = no mess inside
- Snapdragons ‘Chantilly’ — early bloomers add charm
- Ammi majus (“Queen Anne's Lace”) — delicate filler lighting up arrangements
Perennials & Bulbs:
- Peony ‘Coral Charm’ — spectacular showstopper late May
- Dahlia ‘Cafe au Lait’ — creamy blooms hold late summer drama
- Allium sphaerocephalon — spiky architectural interest mid-June
Foliage + Extra Fillers:
- Dusty Miller (‘Silverdust’) — adds soft silver contrast
- Basil ‘Aromatto’ — scent + vibrant green leaf bonus
- Mint (in containers!) — reliable greenery base for bouquets
Unexpected tip: Plant more fillers than you think—they can make or break an arrangement faster than any fancy bloom!
One year I grew only eye-catching flowers with zero greens… ended up with bouquets that looked like confetti tossed in jars.
Step 4: Layout For Ease & Efficiency
There’s no single right answer—just layouts that minimize headaches while harvesting every few days:
| Layout Style | Best Fit | How & Why |
|---|---|---|
| Straight Rows | Large beds | Each species its own row; easy weeding |
| Blocks/Grid | Small plots/patio | Maximizes harvest per square foot |
| Mixed Edge Rows | Potager/veggie combo | Plants along veggies boost pollination too |
Paths? Make them wide enough for your bucket plus hips! Anything less than 18 inches turns into jungle paths mid-season.
I once left only foot-wide lanes between blocks—by July they were claustrophobic thickets impossible to navigate without bending/kneeling constantly.
3. Rookie Mistakes To Dodge—Fast Track Your Success
Mistakes are part of learning—but here’s how to avoid common time-sinks right from the start:
-
Dumping All Seeds At Once:
Problem: Massive flush followed by silence and empty beds.
Solution: Succession sow fast growers (zinnia/cosmos) every three weeks through midsummer. -
Ignoring Fillers/Foliage:
Problem: Bouquets look thin or awkward despite fancy blooms inside.
Solution: Mix in dill/basil/mint among flowers; add signature grasses like briza/nigella seedpods. -
Overcrowding Plants:
Problem: Weak stems flopping over + fungal diseases like powdery mildew thrive in tight spaces.
Solution: Stick religiously to spacing instructions—even if plot looks sparse early on! -
Putting Looks Over Production:
Problem: You hesitate to cut because the bed looks too pretty—it stifles harvest potential.
Solution: Dedicate at least one planting block purely for cutting—even if out of sight behind garage or fence. -
Skipping Support Structures:
Problem: Snap-happy cosmos/leaves lost after storms ruin weeks of growth!
Solution: Stretch netting across beds ($30 per roll lasts years) or stake tall plants individually.
4. Level Up Your Game: Insider Tips For Bumper Crops
Want your garden to burst with blooms all season instead of one short flush? Try these pro tips:
Precision Succession Sowing
Divide crops into thirds and plant spaced out every three weeks starting just after last frost date—for example, Zinnia in zone 6B might look like:
- Batch #1 indoor start: May 10th
- Batch #2 direct sow outside: May 31st
- Batch #3 direct sow outside: June 21st
Set phone reminders now—you’ll thank yourself on those slow July days when armloads still come flying in!
Adding Woody Stems & Shrubs
Try integrating fast-growing branches such as willows (Salix), dogwoods (Cornus), or panicle hydrangea (Hydrangea paniculata):
- Early spring branches add structure when flowers are scarce,
- Late fall berries/foliage keep arrangements interesting beyond annual season,
Most gardeners see payoffs starting year two.
Season Extension Hacks
Small DIY high tunnels ($60 kits with PVC hoops + row covers) push crops like larkspur/sweet peas early—and keep snapdragons blooming beyond first frost! I pulled sweet peas well into Halloween last year while neighbors lost theirs mid-Oct.
Focus On Fragrance & Pollinators
Nothing beats homegrown scented stocks (Matthiola incana) or old-fashioned sweet peas (‘Cupani’) for bringing floral nostalgia indoors—and flowers benefit from borage/fennel nearby attracting bees while helping squash aphids naturally!
5. Gear Worth Investing In (& Budget)
After cycling through gadgets from fancy pruners to DIY watering rigs, these essentials earned their place permanently:
-
Felco #2 Pruners ($60):
Swiss-engineered slicers last decades; sharp clean cuts help stems last longer in vases. -
Tall Sturdy Buckets ($8–15 each):
Works better than flowerpots during harvest runs since tall buckets support long gladiolus/sunflower stems upright. -
Bamboo Stakes ($10/bundle):
Reusable supports paired with jute twine ($5/roll) make staking easy for individual giants. -
Horticultural Netting ($30/roll):
Covers entire rows; holds everything upright during wind/rain storms—a huge time saver. -
Japanese Hand Hoe (“Nejiri Gama,” $15):
Slice weeds close around dense plants without digging stuff up accidentally—all day gardening without sore wrists!
Total Starter Investment: Under $150—this pays off season after season by saving labor and increasing yields dramatically.
6. Real Stories, Real Gardens: Inspiration Across Spaces & Climates
Learning from others helps us skip rookie pitfalls faster—and maybe inspires new ideas!
Suburban Raised Bed Success – Lisa, Wisconsin
Lisa started with one deep raised bed along her driveway mixing zinnias/cosmos/basil/dill through three staggered sowings (May-July). Her secret weapon was deadheading every Saturday morning—and her bouquet yield doubled by August compared to neighbors who harvested sporadically.
Urban Balcony Containers – Jamal, Brooklyn
On his tiny city balcony Jamal packed four large planters full of dwarf sunflowers (‘Suntastic’) plus trailing nasturtium/calendula mixed in pots fed monthly organic fertilizer pellets—and used self-watering containers during heat waves when container soil dries super fast.He harvested mini-bouquets nearly all summer long that brightened his apartment and neighborhood hallway alike!
Mini-Farm Mastery – Tanya, Oregon
Balancing an acre split between veggies/flowers Tanya learned airflow matters big time after powdery mildew dashed her dahlias one wet June.By spreading plants wider + installing mesh netting she saw fewer lost blooms AND healthier stems—even boosting final harvest volume noticeably that year!
7. Troubleshooting Guide: When Things Go Wrong (And How To Fix It)
Gardening never runs perfectly—here are fixes for common headaches:
Sparse Blooms Mid-season?
Mostly caused by skipped succession sowings or nutrient-depleted soil:
→ Topdress beds ASAP with fresh compost + start new batches of cosmos/zinnias/ammi—even midsummer sowings’ll surprise you!
Powdery Mildew Or Disease Outbreaks?
Common killers especially in tightly packed humid beds:
→ Thin foliage early to improve airflow → handpick pests like Japanese beetles by dawn → spray neem oil weekly as preventive measure before infestation explodes (never after!)
Floppy Or Crooked Stems?
Usually lack of staking/support or insufficient pinching/pruning as young plants grow tall fast:
→ Pinch back cosmos/zinnia seedlings hard when they reach about eight inches tall → set nets/netting early before heavy winds hit.
8. Four Week Action Plan For Bouquets Fast!
Clear steps so you’re not overwhelmed—hit these milestones weekly:
Week One
1. Choose your space/pots (+ ensure >6 hours sun daily).
2. Test soil pH/add compost/manure as needed prepare bed well ahead of planting season via loose tilling/mulching..
3. Order seeds/tubers suitable for climate + flowering windows planned (check local extension tips!)
Week Two
1. Sketch rough “treasure map” noting mature heights + grouping compatible crops together
2. Pre-soak delicate seeds like sweet peas overnight before planting
Week Three
1. Start cool-loving transplants outside OR warm-season seeds indoors depending on species
2. Mulch once seedlings reach around four inches height
Week Four
1. Erect stakes/netting BEFORE growth explodes get ahead of wind/flop challenges
2. Kick off regular deadheading routine soon after first blooms open
Keep notes/photos along the way—you’ll learn faster what truly works versus what was just theory!
9. Keep Growing Every Year: Path To Mastery
The best cutting gardens evolve alongside their gardeners—they never feel "finished." Keep these tips close:
- Every season brings new lessons—marker which varieties flourished/flopped/mildewed track changes from year-to-year.
- Experiment annually—in small scale—to try new specialty seeds but keep your dependable favorites front-and-center each spring.
- Join local community groups/gardening clubs whenever possible—their hands-on advice beats any blog post alone!
- Avoid burnout starting small but confident then build upon success rather than bite off too much at once!
- Cut aggressively—the best way to encourage repeat bloom unlike ornamental borders where picking feels forbidden!
- Don’t overlook herbs—they often outlast “flashier” flowers indoors post-harvest thanks to slow wilting/scent longevity e.g., basil/mint/dill perfect bouquet companions inside/outside
Above all—the secret ingredient has little to do with fancy tricks but comes down to staying curious (not perfect!), persistent tinkering turning bare dirt into lush abundance year after year…
Because each bunch you cut isn’t just flowers—it’s another chapter carved into both those garden beds and the gardener within.
This guide blends tried-and-tested methods plus real-world experience along with practical know-how so whether your first arrangement sings or declines—you’re set up for long-term joyful success building the kind of cutting garden that fills kitchens…and hearts alike.
Happy growing & happy picking!