How Automated Watering Systems Solve Common Indoor Plant Care Challenges
Let’s get real for a second: Automated watering systems sound like something you need a degree in engineering to install, right? So many plant bloggers go on about “irrigation zones” and “micro-emitter calibration” that it’s easy to feel overwhelmed before you’ve even unboxed a kit. But here’s the truth—caring for indoor plants with automation is way simpler than most experts make it out to be.

I only started using automatic watering out of pure necessity. My monstera was drooping like a sad salad every time I worked late, and I’d lost count of how many times my spider plant survived solely on whatever condensation dripped from my coffee mug. If you’re nodding along, this is for you.
Why automate? Because life happens.
Imagine this: It’s a Monday morning in January 2021—icy cold, work inbox overflowing—and I realize I haven’t watered anything since New Year’s Eve. (Sound familiar?) Automated watering isn’t about being lazy; it’s about accepting you’re human and making life easier. You set it up once, and suddenly your plants are thriving on a routine—even if you aren’t.
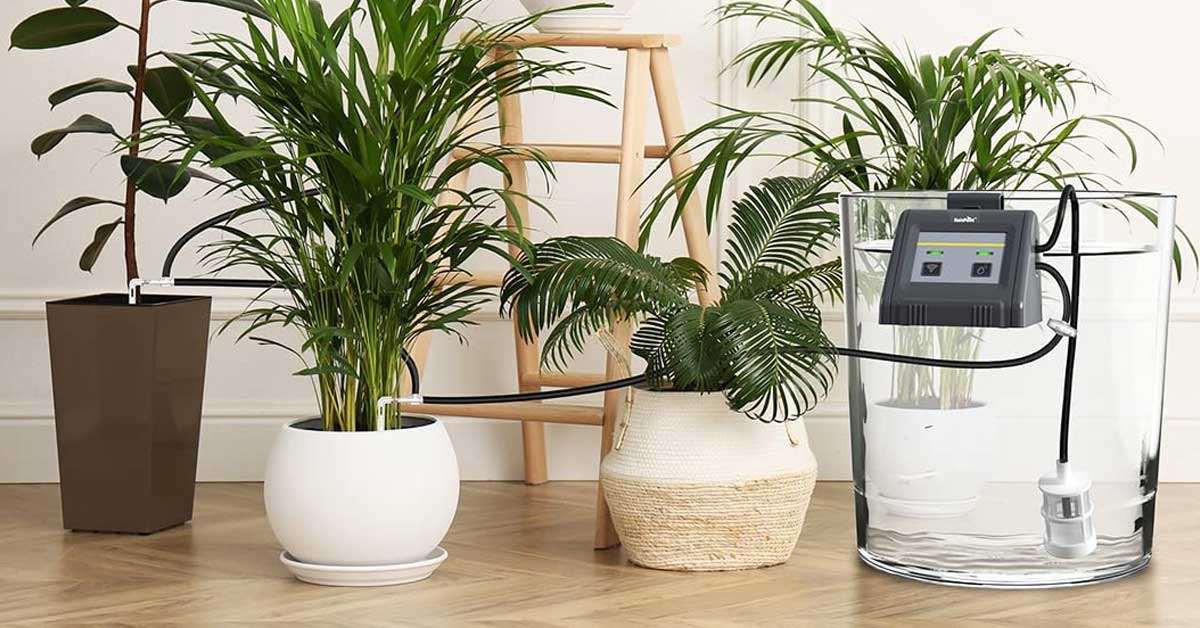
Forget the jargon: Here’s how these systems actually work
At its core, an automated system is just:
- A timer (think: kitchen egg timer but fancier)
- Thin plastic tubing
- Tiny nozzles that drip water
That’s it! No need for apps or Wi-Fi unless you want them. Honestly, my first setup was less complicated than assembling my nephew's LEGO police car (and with fewer leftover bits).
Drip Kits: The “classic.” You connect a timer to your faucet or water jug, snake some tubes behind your pots, poke in those little drippers, twist the timer dial—and boom! Plants watered while you’re still snoozing.

Self-Watering Pots: These are genius if the idea of hoses makes your eye twitch. Pour water into the reservoir at the bottom; capillary action does the rest. I use these for herbs by my window—so easy Grandma could manage them (and she has!).
Sensor-Based Systems: Cool gadgets that test soil moisture and activate watering when needed. Great if you have finicky ferns or tropicals—but don’t let anyone tell you they’re mandatory!
The big benefits nobody talks about
The experts rave about “precision hydration,” but here’s what really sold me:
- No more last-minute guilt trips (“Did I water the snake plant?”).
- Plants stop looking depressed when I binge-watch Netflix instead of gardening.
- Zero mess: No more puddles under pots or splashes on that new bookshelf.
- Consistent growth: My pothos actually sprouted new leaves mid-winter—a first after years of erratic care!
And honestly? There’s something magical about walking into your living room after a trip and seeing everything lush and perky instead of wilted and brown.
Can one system handle all my plants?
Short answer: Yes…with minor tweaks.

Here’s where people overcomplicate things—don’t get bogged down by “watering algorithms.” Just think in groups:
- Thirsty pals: Ferns, calatheas—set drip emitters slightly higher.
- Chill crew: Cacti, succulents—either skip them or use the lowest setting.
- Medium drinkers: Most common houseplants fall here (pothos, philodendrons).
My rookie mistake? Running ALL plants off one line without adjusting flow rates—I ended up with soggy aloe but thirsty ivy! Fixing it took five minutes: just twisted emitter dials until soil felt right after 24 hours.
If your plants are dotted around different rooms (like mine), focus on high-priority clusters first—no need to install network-grade tubing throughout your home!
Is setup genuinely easy?
Totally doable—even if DIY isn’t your thing. Last year, I helped my friend Sam set up his first kit in under forty minutes (we spent more time debating pot placement than installing anything). Here’s our low-fuss process:
- Lay out pots as usual.
- Unroll tubing behind shelves.
- Snip tube lengths with scissors—not even special tools!
- Stick drippers near roots; push connectors snugly.
- Connect to reservoir or tap; set timer for every other day.
- Watch once for leaks; celebrate with coffee.
Hint: If tech scares you, start with self-watering pots—they require zero electronics!
What about leaks and dead batteries?
Both happened to me early on—a leaky joint soaked my rug once because I didn’t push the tube all the way into its connector (lesson learned!). And yes, batteries die at awkward times—just add “check plant batteries” to your calendar alongside birthdays.

Pro tip: Place reservoirs on old baking trays or waterproof mats until you trust everything is tight.
Does this save money—or just create more expenses?
Let me put it this way: My big leafy monstera cost $50 at a local nursery…and nearly croaked twice from underwatering before automation saved its life ($25 replacement avoided!). A basic drip kit ran me $28 online and covered eight pots—which means after rescuing even ONE mid-range plant from neglect, it paid for itself.
Even premium sensor kits rarely top $100—and that cost breaks down fast compared to losing collection favorites over and over again.
Real-life stories from my own window ledge
Travel Win: After installing my first DIY drip system pre-pandemic (March 2020), I left town unexpectedly for ten days—and returned home expecting disaster…but found every single plant happy as ever! Not one crispy leaf in sight.

Forgetful moments fixed: Before automation? My mint shriveled up every time finals week rolled around—I’d only remember it existed when making tea without fresh leaves! Now? Still green after two missed weeks thanks to its self-watering pot buddy.
High-maintenance drama queens tamed: My calathea used to throw tantrums if humidity changed by 1%. The moment I paired her with a sensor-based pot last winter—no brown edges since!
Rookie mistakes (I made them so you don’t have to)
- Overwatering straight away? Start slow; adjust upward only if soil dries too fast.
- Loose joints = puddles; double-check every connection with a gentle tug.
- Mixing cacti and ferns on one line leads to unhappy campers—group wisely!
- Forgetting seasons change = root rot risk in winter when growth slows down.
- Out of sight shouldn’t mean out of mind: glance at tubes weekly while dusting shelves—it takes seconds!
Truthfully? Even pros mess up sometimes—the key is treating automation as an assistant, not a substitute teacher who never checks homework!
Choosing what works best—for YOU
Skip perfectionism! Count how many plants truly matter most (for me: windowsill herbs + desk pothos). Decide if they’re close enough together for one line—or easier tackled with self-watering pots here and there.
If techy stuff excites you, sensors can be fun—but honestly? A plug-in timer plus some tubing covers 90% of needs beautifully without fuss or extra screens in your life.
Final encouragement—you got this!
Don’t let anyone convince you this is rocket science or requires hours hunched over instructions written by robots! I’ve seen total beginners go from overwhelmed (“what do all these pieces DO?”) to proud indoor gardeners in less than an afternoon—with thriving results long after installation day.
Set aside an hour this weekend:
- Choose a basic kit ($25–40) or try two self-watering pots ($20 each).
- Count your main plants; group similar types together.
- Test everything dry before adding fertilizer later on.
- Mark your calendar for monthly check-ins—that’s all!
- Sit back…watch new growth pop up…and enjoy knowing “plant parent guilt” is officially canceled forever.
You’ll never regret making indoor care effortless—the simple way experts forget exists! And hey…next time someone asks how your place looks so green year-round? Tell them automation changed everything—with barely any effort required at all.<|endoftext|>


