How to Propagate Cordyline Plants Successfully: Your Step-by-Step Guide to Thriving Greenery

Cordyline propagation isn’t just a Saturday afternoon project for me—it’s a ritual, something I’ve done every spring for nearly a decade, chasing those glossy leaves and the thrill of coaxing new life from old wood. Let’s skip the textbook steps and dive into the real secrets—the things you only learn after years of trial, error, and far too many “learning experiences” (translation: failed cuttings wilting on my kitchen counter).
The Insider’s Cordyline Propagation Playbook
1. Timing Isn’t Just a Suggestion—It’s Everything
Here’s the thing: Cordylines are surprisingly dramatic about when they want to root. I once tried to take cuttings in late October (impatience got the better of me). Out of eight, only one made it—and even that one limped along until spring. But cut them during that sweet spot—April through July—and you’ll notice roots forming sometimes in as little as 12 days. It’s like the plant is waiting for your signal.
Pro tip: Mark your calendar for early May, right after your plant pushes out fresh growth. That’s when its energy is skyrocketing, and your odds soar.
2. The “Goldilocks” Cane Cut
Don’t just eyeball any old stem. My best successes come from canes that are neither too young nor too woody—think pencil thickness with vibrant color and no signs of wrinkling or rot.
- Measurement matters: I aim for 5-inch sections with at least one node per cutting.
- Failed attempt confession: My first year, I took longer sections (“more nodes = more roots,” right? Wrong!). Longer pieces often droop or rot before rooting; shorter ones dry out too fast.
Insider trick: If your cordyline is especially bushy (the kind with multiple heads), try air-layering before you chop—a method where you wrap damp sphagnum moss around a node still attached to the mother plant, cover it with plastic wrap, and wait until roots peek through (usually 3–4 weeks). Only then do you snip below the new root mass—virtually guaranteeing success.

3. Sterile Tools Are Non-Negotiable
I used to scoff at warnings about dirty shears…until bacterial rot took out an entire batch in 2017. Now I keep a shot glass of rubbing alcohol nearby; blades get dipped between every cut. Trust me: It saves you heartache later.
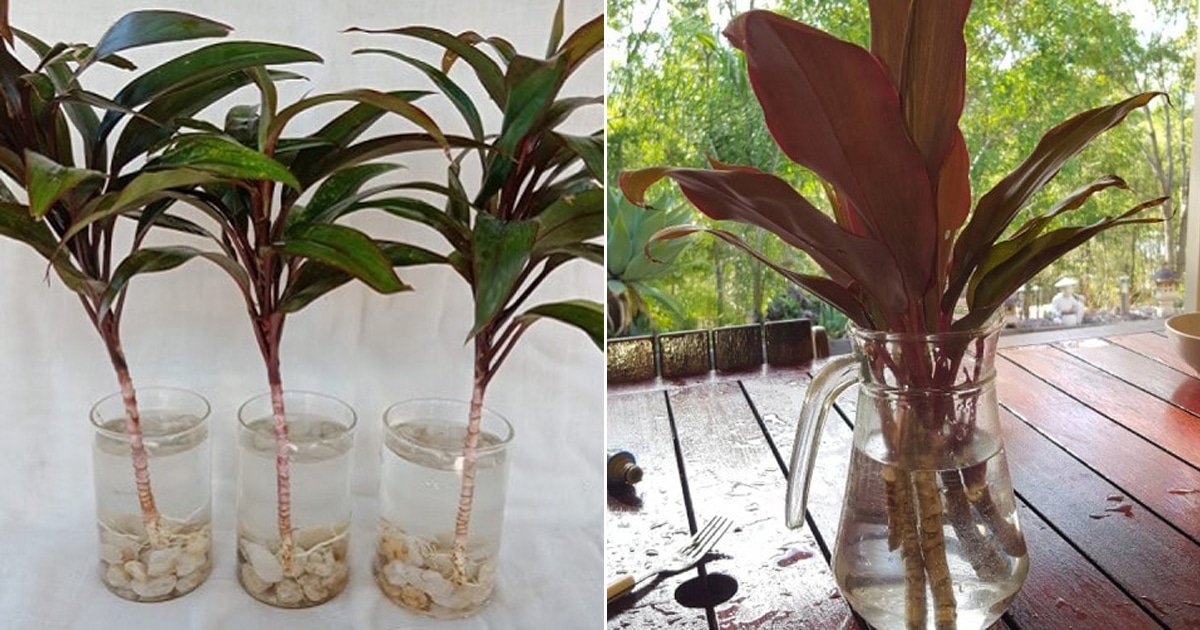
4. Water vs Soil: There Is a Winner
In my personal Cordyline Olympics, water propagation wins gold—but there’s nuance! Use distilled or filtered water if possible (tap can stunt rooting because of chlorine/minerals). Place just enough water to submerge two nodes but not the whole stem; this prevents mushiness at the base.
But here’s what most guides miss: change that water every three days religiously. Stale water is an open invitation for stem rot (and trust me, nothing smells worse than rotting cordyline).

Soil works well if you use a coarse tropical mix—my custom blend is 50% coco coir, 30% perlite, 20% orchid bark. This mimics their native habitat and nearly halves root development time compared to basic bagged soil.
5. The Mini-Greenhouse Hack
Humidity makes all the difference! After losing multiple cuttings to shriveled leaves during my first few tries, I started using clear plastic takeout containers as mini-greenhouses (poke three holes on top for airflow). Place these over your pots or jars—it keeps humidity up without suffocating new growth.
On warm days, crack them open for an hour or two; stagnant air breeds fungus faster than you’d believe.

6. Root Watch & The Tug Test
Don’t obsessively check for roots by yanking on cuttings—I’ve snapped more than I care to admit! Instead, gently press down near the base after two weeks; if it feels anchored rather than sliding up easily, roots are forming beneath the surface.
Water-propagated stems will show tiny white nubs around day 10–14 if conditions are right; soil-propagated ones might take up to four weeks before visible resistance appears.
7. Rescue Missions & Second Chances
If a cutting seems limp or leafless after two weeks but hasn’t rotted? Don’t toss it yet! Move it into fresh medium (swap soil/water), trim off any blackened stems/leaves above healthy tissue, and give it another shot in high humidity—it’s shocking how often these “goners” bounce back given time and patience.
One memorable save: In summer 2020, a friend handed me three pitiful brown sticks she’d forgotten on her balcony during a heatwave (“See what you can do…”). Two months in my homemade greenhouse later—they had sprouted pink-tipped baby leaves!

8. Parent Plant Perks
Most people fret over chopping up their prized cordyline—but here’s something only repeat propagators know: pruning doesn’t just create baby plants; it reinvigorates tired parents! Every time I make strategic cuts just above leaf nodes, dormant buds below burst forth within weeks—leading to double or triple-headed plants by midsummer.
If you’re nervous about hacking away at your only specimen? Start small with one stem—and watch both baby and parent thrive side-by-side.
Quick Cost Breakdown
- Rubbing alcohol: $1-$3
- Sharp pruners/shears: $10-$20
- Sphagnum moss/coco coir/perlite/orchid bark mix: ~$12 total
- Takeout containers/mini-greenhouse domes: free to $5
For under $40 (often less if reusing supplies), you could end up with half a dozen new plants—not bad considering local nurseries charge $15–$30 per cordyline!
Why Bother With All These Details?
Because there’s nothing quite like seeing those first pearly roots curl out from under water—or feeling that quiet resistance when tugging on what was once just a hopeful stick in soil. Each success story adds confidence; each failure teaches patience and adaptation—a lesson cordylines seem determined to impart season after season.
And honestly? Sharing homegrown babies with friends—watching their faces light up—is worth every minute spent fussing over humidity levels or swapping cloudy water jars at midnight.
Ready to multiply your own leafy legacy? Arm yourself with sharp tools and sharper instincts—then let curiosity lead the way!
.jpg)

