Indoor Aquaponics Basics: A Simple Guide to Growing Fresh Food at Home

When I first dove into indoor aquaponics back in late 2017, I was captivated not just by the glossy Instagram shots of fish beneath flourishing greens, but by the efficiency it promised—growing food in a closed-loop system right inside my home. But I quickly learned it’s not as simple as “toss fish in and watch plants grow.” Nor is it rocket science. It’s somewhere in between—a careful balancing act that requires patience, observation, and knowing the ecosystem’s subtle rhythms.
Over more than five years—and after cleaning up three unfortunate leaks—I’ve boiled down what really matters for a thriving, low-maintenance indoor aquaponics setup. This article will guide you through the essentials, from foundational biology to practical design tips, troubleshooting tricks, and even ways to scale up without losing your mind.
What Indoor Aquaponics Really Is — Beyond the Basic Pitch
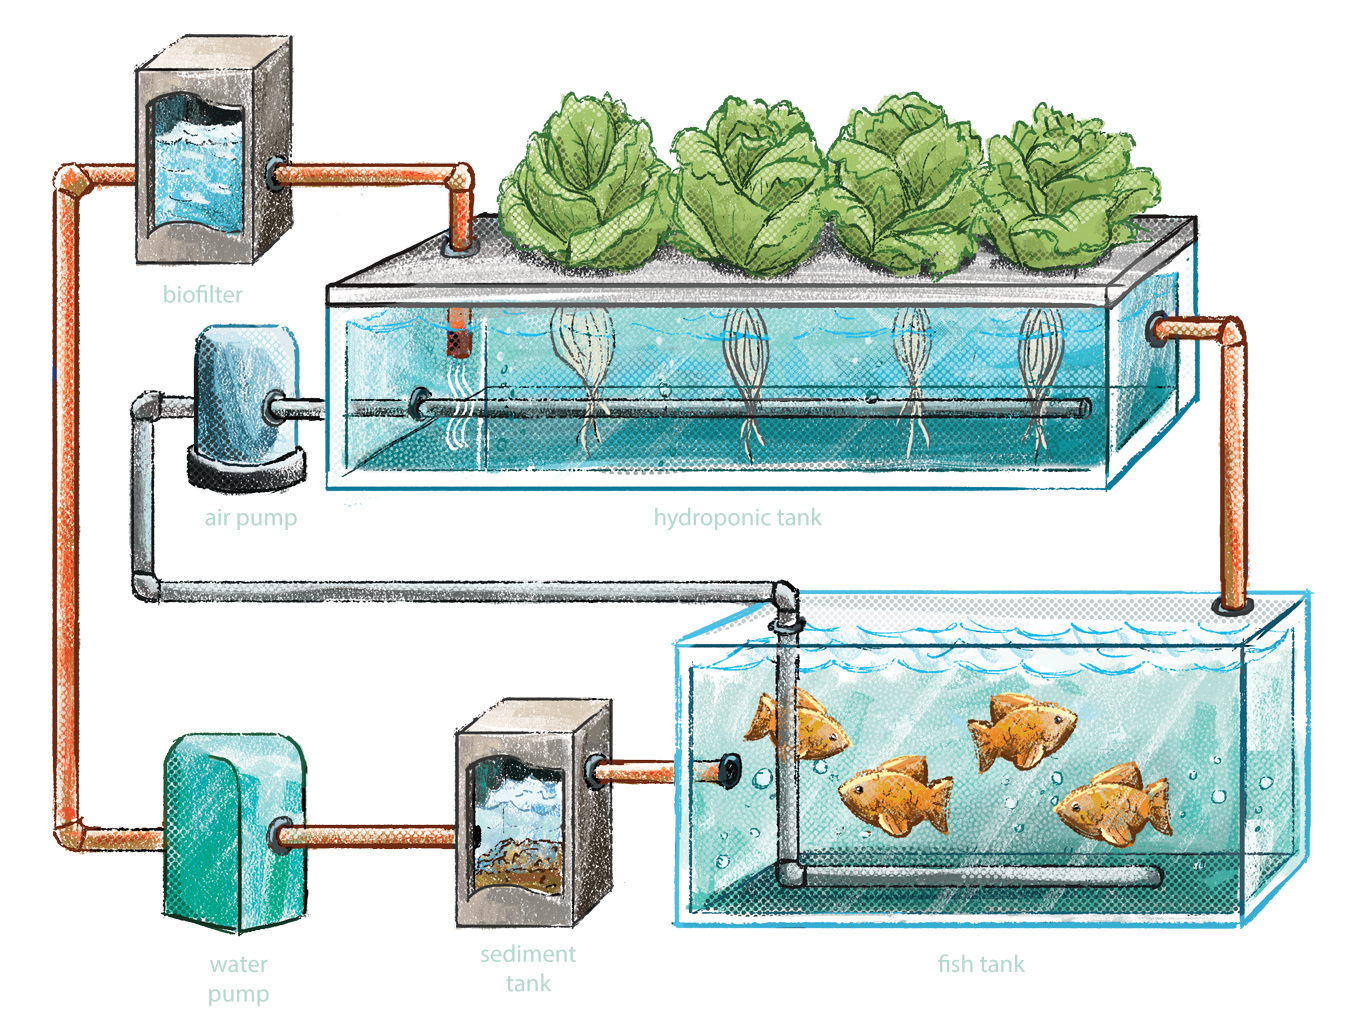
At its heart, indoor aquaponics is about crafting a tiny ecosystem: fish (or other aquatic critters), beneficial bacteria, and plants all living in a loop together. The usual explanation goes like this:
Fish produce waste → bacteria convert waste into nutrients → plants soak up these nutrients → clean water goes back to fish.
That’s true on paper—but getting this balance stable indoors is where most beginners hit walls. Why? Because each part depends on the others in delicate ways. Overfeed your fish or skip testing water parameters regularly, and ammonia spikes or nasty nitrite buildup can kill your plants and fish before you even realize what went wrong.
Imagine caring for two very different pets under one roof—one swimming below, one growing above. Miss their distinct needs (water chemistry for fish; light and root environment for plants) even briefly, and your whole system can collapse.
If you want to get ahead of the curve, make sure you understand the essential water quality parameters for healthy indoor aquaponics—this knowledge will save you countless headaches later on.
Why Balance Matters More Than Fancy Gadgets
People often chase expensive pumps or flashy grow lights thinking they’ll fix everything. But research (like Rakocy et al.’s extensive work from University of the Virgin Islands) shows that most system failures come down to misunderstanding bio-cycles or neglecting daily maintenance—not hardware defects.
So if you’re overwhelmed: start with mastering the biology first rather than hunting gear upgrades.
The Nitrogen Cycle – Your Invisible Engine Room
Having a solid grasp of the nitrogen cycle is crucial for success—and no matter how many gadgets you buy, this invisible process keeps your ecosystem humming—or makes it crash.
Here’s a simplified breakdown:
- Fish produce ammonia (NH3) through their waste and respiration.
- Ammonia at levels above roughly 0.25 ppm is toxic—not just to fish but also beneficial bacteria.
- Nitrosomonas bacteria convert ammonia into nitrites (NO2⁻), which are also poisonous.
- Then Nitrospira bacteria take nitrites and turn them into nitrates (NO3⁻).
- Nitrates are the form of nitrogen plants love—they absorb nitrates as food.
- With healthy plants sucking up nitrates, your water stays clean enough for fish.
A Common Rookie Mistake: Rushing Cycling
I’ve seen many beginners jump to add fish immediately after setting up their tanks thinking “this will speed things up!” Spoiler: It doesn’t.

Cycling—the process where bacterial colonies build up enough surface area and population to handle ammonia—is slow indoors because temperature/light/fish load aren’t always ideal. Expect around 4–6 weeks minimum before adding any precious livestock or delicate plants.
If someone promises instant cycling kits or “no waiting” methods, proceed with caution—they often lead to toxic spikes weeks later when bacteria haven’t established properly.
Picking Your System Design — Which Setup Really Fits You?
I’ve tinkered with everything from tiny bookshelf systems (less than 10 gallons) to professional-scale 100-gallon urban farm builds. Here’s what I learned:
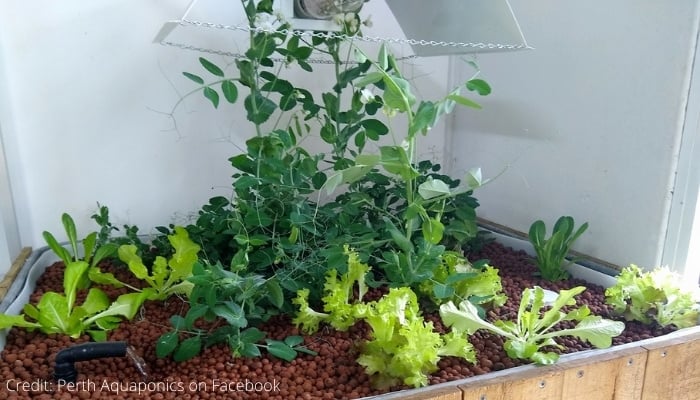
Start Simple — Media Bed Systems Are Your Best Friend
For beginners indoors especially, media-bed systems reign supreme:
- Grow bed sits above the tank filled with inert media like expanded clay pebbles.
- This media physically supports roots and provides huge surface area for beneficial bacteria.
- Because media beds act as both mechanical filters and biofilters, they require less frequent cleaning than other systems.
Media beds offer a forgiving buffer against small mistakes—if your pump hiccups or lighting dims briefly, plants don’t die overnight.
If you’re interested in a step-by-step approach to getting your first setup off the ground, check out this guide to setting up a small-scale indoor aquaponics system.
Caution About Deep Water Culture (DWC)
Though DWC systems look sleek—floating rafts of seedlings on water—they can be temperamental indoors without commercial-grade climate control:
- Root rot sets in easily due to oxygen depletion.
- Temperature swings under household LEDs cause stress.
- Pumps can clog with muck faster; algae bloom more readily without shading options outdoors.
One family I coached tried DWC basil under bedroom LEDs last year; after two months fighting slimy roots and wilting stems despite consistent feeding schedules, we switched them back to media beds—and growth improved dramatically within two weeks.
So unless you’re ready to invest serious attention/resources upfront or have prior aquaponic experience—media beds are safer ground.
Must-Have Equipment — Don’t Skip These Basics
From dozens of personal trials plus community feedback, these specs cover essentials you'll regret not following:
| Component | Minimum Specs | Why It Matters | What Happens If You Skip It |
|---|---|---|---|
| Tank | 20–75 gallons; opaque preferred | Larger volume buffers chemistry swings | Small tank = quick-toxicity spikes; clear tanks invite algae blooms |
| Grow Bed | At least 8" depth media bed | Supports healthy root growth + biofilm | Shallow beds dry too fast/scald roots |
| Pump | Moves total tank volume twice/hour | Ensures circulation plus oxygenation | Weak flow = dead spots + nutrient stratification |
| Lighting | Full-spectrum LED @ ~6500K; ≥700 lux at canopy level* | Critical for photosynthesis | Weak light = spindly seedlings & yellow leaves |
| Growing Media | Expanded clay pebbles (Hydroton) | Inert + excellent aeration & drainage | Soil/sand retains pathogens & compacts roots |
| Thermometer | Digital w/ min/max memory | Track day-night fluctuations | Undetected temp swings cause stress |
| Test Kits | pH/ammonia/nitrite/nitrate kits | Data-driven adjustments avoid guesswork | Blind dosing → crashes common |
*Lux is light intensity; aim for at least 700 lux directly on leaves for leafy greens.
Optional but smart additions if using tropical fish like tilapia or keeping tanks cool in winter:
- Heater(s) adjusted to maintain ~74–82°F (23–28°C)
- Air stones or diffusers boosting oxygen levels
Goldfish usually tolerate a wider temp range (50–75°F), but expect slower growth when chilly.
If you’re still deciding which fish to start with, this guide on choosing the best fish species for indoor aquaponics systems breaks down the pros and cons of popular options like tilapia, goldfish, and more.

How To Get Started — A Practical Step-by-Step Guide With Numbers
Here’s how I’d approach building an indoor aquaponics setup if starting fresh today:
Step 1: Clarify Your Space & Budget
Knowing space constraints upfront avoids costly surprises later:
- Kitchen Counter / Small Table: Target ≤20 gallons total volume; budget $150–$250
- Spare Closet / Nook / Garage Corner: Up to ~40 gallons; ~$220–$400 depending on gear choices
Example budget from my third build (mid-sized media bed):
| Item | Cost |
|---|---|
| Used Glass Tank (40 gal) | $70 |
| Grow Bed Tote + Stand | $60 |
| Pump + Tubing + Fittings | $45 |
| Lighting (2 x Spider Farmer SF1000 LEDs) | $180 |
| Expanded Clay Pebbles | $35 per bag |
| Heater + Thermometer Combo | $19 |
Total: Just under $410 — Slightly pricier than cheap kits ($165), but worth every penny given reliability improvements.
Step 2: Dry Run & Leak Test — Save Your Floors!
Fill everything up; run pumps/lights/heaters continuously for at least 72 hours before introducing any living organisms.
Check carefully underneath with paper towels or thin cardboard—early detection can prevent ruining a rental deposit like it did mine once! Also watch electrical cords/power strips closely for any unexpected hums or shorts during this test phase.
Step 3: Cycle Your System Before Adding Fish!
Skipping cycling is probably the biggest beginner error causing mass kills later on. Take patience here—it pays off big time!
How I do it:
- Add pure household ammonia (about 5 ml per ten gallons); do NOT use soap-based ammonia!
- Alternatively seed beneficial bacteria by adding gravel/filter material from an established aquarium.
- Run pumps/filters/lights but no fish yet.
- Test daily at roughly same time using nitrogen cycle test kits:
- Watch ammonia rise then fall below 0.25 ppm,
- Nitrites peak then drop near zero,
- Nitrates steadily climb above ~10 ppm
- Once these benchmarks hold steady several days straight—you’re safe to add hardy starter species (goldfish are great beginners).
On my latest build, careful cycling with no shortcuts meant zero juvenile fish deaths—even six months later while ramping plant loads gradually upward.
What Goes Wrong—and How To Fix It Before Panic Sets In
Every beginner faces similar headaches early on—here are real symptoms with causes/fixes based on hundreds of troubleshooting hours:
Symptom #1: Lettuce Leaves Curling or Yellowing
Often easy fix: Insufficient light intensity rather than nutrient deficiency!
Measure light output if possible—below ~700 lux means lettuce literally starves underground despite water quality being fine. Upgrade bulbs first before stressing about feeding regimes!
If you’re not sure what kind of lights to use or how much intensity your plants need, see this in-depth guide on lighting options and requirements for indoor aquaponics gardens.
Symptom #2: Swampy Kitchen Smell
99% chance you’re overfeeding fish or neglecting weekly cleaning around pump intakes/media surfaces where food debris accumulates anaerobically producing foul odors. Solution? Scale feeding back slightly AND commit to bi-weekly media rinse cycles removing gunk buildup before slime takes hold.
Symptom #3: Midnight Overflow Scare
Water running onto floors scares everyone… but entirely preventable by placing spill trays/mats beneath all tanks/grow beds from day one—even if they seem overkill initially! Trust me—it saves nerves after first near-flood experience.
Symptom #4: Fish Gasping At Surface
Usually low dissolved oxygen triggered by overstocking tanks or reduced aeration capacity during night feedings/winter chill spells. Boost air stones/aerators promptly AND reduce evening feeding temporarily until water stabilizes again.
For a detailed breakdown of how to handle these and other issues, bookmark this resource on troubleshooting common problems in indoor aquaponics systems—it’s a lifesaver when you hit your first snag.
Level-Up Strategies — When You Feel Ready To Push Beyond Basics
Once you’ve got routine maintenance dialed in smoothly (~month two onward), here are some proven advanced moves I’ve adopted that saved crops from disaster multiple times:
Automated Timers Are Tiny Game Changers
Simple programmable outlet timers ($13–27 online) let you lock precise lighting/pump cycles—even going away on vacation isn’t nerve-wracking anymore! For instance: My cilantro batch survived a power blip last spring thanks to WiFi-enabled smart plugs auto-resetting lamps quickly while I was out hiking overnight.
Modular Setup Design Pays Back Big Time
Design grow beds/tanks so you can remove individual pieces without dismantling the whole system—same principle research stations use at UVI labs where isolating problems rapidly avoids catastrophic crop losses during outbreaks or maintenance windows. Modular quick-disconnect fittings help here greatly too!
Tools That Pro Growers Won’t Trade Off
Looking inside my toolbox now reveals some must-haves that cut down anxiety dramatically:
-
API Master Freshwater Test Kit / Apera PC60 digital meter
Yes upfront cost ($30–$90 range) but pays off triple-fold avoiding guesswork disasters early on. -
Mars Hydro TS600 Full Spectrum LEDs
Reliable PAR readings >800 μmol/m²·s mean lush growth year-round without constantly swapping bulbs. -
Jebao Quiet Submersible Pumps
Quieter operation than bargain brands plus less prone to clogs—a small luxury after early sleepless nights fixing noisy equipment. -
Botanicare Hydroton Expanded Clay Pebbles
Nearly inert after rinsing well; lasts through multiple build cycles unlike cheaper alternatives that break down fast. -
(Optional) OmniSense Wi-Fi Leak Detector
If growing above carpet/carpeted rooms/home office spaces—this little gadget ($24) gives priceless peace of mind catching leaks early enough before disaster hits floorboards seriously.
Pro tip from trial-and-error: use gaffer tape—not duct tape—for tubing joins/drainage fittings around grow beds; easier removal later without sticky residue ruining gear surfaces long term.
Real-Life Tales Busting Common Myths
One client emailed frustrated that parsley crop was dying because water turned cloudy right after repotting new seedlings—in reality her microbiome had doubled after minor pH shifts (+0.4 change). After a few days’ patience letting roots adjust naturally system bounced back stronger than ever!
Another friend swore only expensive tilapia worked—until his eight-year-old daughter brought home cheap feeder goldfish she won fairground prize-wise…those tough little guys survived heater failure during mid-January snowstorm no problem while tilapia would have died outright!
These stories underscore: resilience grows over time—not overnight perfection—and hardy species choice helps bridge beginner bumps too!
Trouble-Shooting With Confidence Like A Seasoned Grower
Issues will hit—that’s guaranteed—but here’s how top operators think differently about fixes instead of panicking blindly:
| Symptom | Likely Cause | Smart Response |
|---|---|---|
| Water turns murky overnight | Organic overload/clogged filter/pump failure | Partial water change (~30%), inspect/clean pump intake ASAP |
| Yellowed or limp new leaves | Weak lighting OR micronutrient deficiencies | Measure light output thoroughly; consider kelp extract supplements sparingly |
| Fish gasping near surface | Low dissolved oxygen | Add/boost air stones immediately; reduce feed amounts temporarily |
| No nitrate buildup post-cycle check | Poor/delayed bacterial colonization | Add more bio-media surface area (extra pebble bags); slow cycle ramp-up |
The trick is spotting small changes over time instead of sweeping system overhauls every week—which risk destabilizing established balance unknowingly.
Quick Action Plan Cheat Sheet
Print this out or enter into your favorite habit tracker app—it’ll help keep momentum steady without guesswork overwhelm!
Day 1 – Write down your location constraints + reasons why you want aquaponics
Day 2 – Set realistic budget caps based on local hardware prices
Week 1 – Assemble gear “dry run” style; fix leaks BEFORE adding any life!
Weeks 2–6 – Patiently cycle system with daily testing & notes
Week X+ – Introduce starter fish/plants gradually—not all at once! Monitor data weekly
Month Two+ – Expand only when stable conditions confirmed across three consecutive tests
Keep a short journal recording tweaks/tests—you’ll spot patterns fast which prevents many headaches months before they become crises.
Staying Engaged & Growing Long-Term Success
Most folks hit plateaus (“Why won’t lettuce canopy fill?” “Why stall fruiting?”). When that happens:
- Sketch clear goals before upgrading cycles (“Do I want herbs only this year? Fruit-bearing crops next?”)
- Follow researchers like Dr James Rakocy/UVI Labs whose long-term datasets beat forum speculation every single time
- Join local Facebook aquaponics groups/Discord communities—posting photos there often nets quick diagnoses—from nutrient deficiencies to pest IDs
- Above all else—embrace challenges as part of mastery! Each problem solved brings you one step closer toward systems that practically tune themselves daily.
Indoor aquaponics isn’t magic—it’s iterative science mixed with hands-on care backed by community support and trusted research insights combined with plenty of trial-and-error spills along the way.
Make your setup uniquely yours—a living experiment yielding fresh food plus daily satisfaction regardless of scale or stage reached so far.
Your next bounty—from blueprint sketch…to sprouting seedling…to goldfish circling below vibrant dinner-ready greens growing by your kitchen window—is only six steps away if you begin today thoughtfully and patiently.
Ready? Let’s solve every hurdle together—from foundations upward—for resilient harvests across many seasons ahead!
If you're curious about specific plant varieties that thrive best indoors under aquaponic conditions—or detailed guides on breeding particular species like tilapia vs goldfish—I’m happy to dive deeper anytime! For inspiration, browse the top plants to grow in indoor aquaponics for beginners, or just ask away so we tailor advice exactly where you need it most next.


