Best Soil and Fertilizer for Optimal Amaryllis Growth Insights

When I first got my amaryllis bulb, I was sure I had it all figured out: store-bought soil, weekly Miracle-Gro, and a sunny windowsill. Spoiler alert—none of that gave me the big, bold blooms I hoped for. Instead, I ended up with a sad little green shoot that looked like it was barely hanging on. The bulb’s base felt mushy, and I wondered if amaryllis were just impossible. For a more detailed look at general care, check out this comprehensive guide to amaryllis plant care and blooming.

Turns out, the usual advice—“use well-draining soil” and “feed regularly with balanced fertilizer”—only tells part of the story. What really made a difference for me was dialing in exactly what soil to use, how to feed, and when to feed. It’s picky, yes—but once you get these right, your amaryllis will reward you with flowers that stop people in their tracks.
Why Your Soil Might Be Slowly Killing Your Amaryllis (Even If It Feels Right)
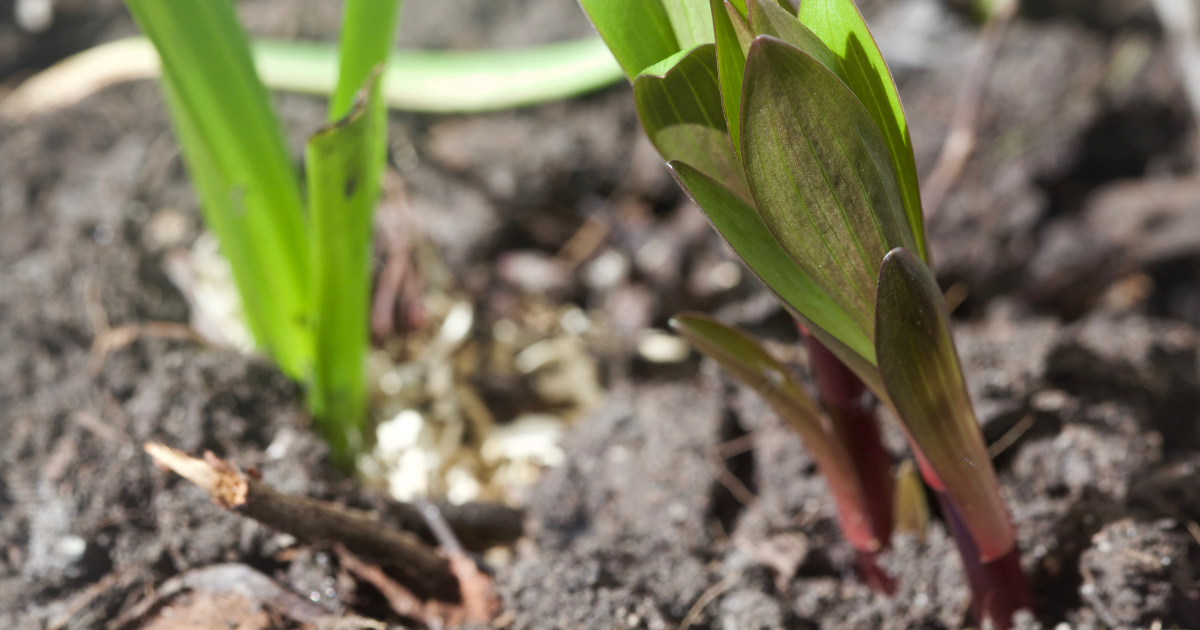
Everyone says “peat moss, perlite, compost,” but no one warns you about the ratios or the quality of those ingredients. My first mix was an equal parts grab bag from whatever bags looked okay at the garden center—not smart. The soil stayed soggy for days and basically drowned my bulb’s roots.
Here’s what turned things around: switching to Sphagnum peat moss (not just any peat) because it holds moisture without turning swampy; then cranking up perlite from about 30% to nearly 50% of the mix. That extra perlite made the soil feel light and airy—almost crunchy—which kept water from pooling at the bulb’s neck. And instead of random compost, I used finely aged worm castings from a local supplier—a slow-release nutrient goldmine that quietly boosted root health.
I wasn’t just guessing here—I tried this new mix on four amaryllis bulbs in our office that had been struggling for months. Three weeks later? Stems shooting up like they meant business.
Quick recipe:
- 40–50% perlite
- 30% Sphagnum peat moss
- 20–30% worm castings compost
This mix drains well but still holds enough moisture so your bulb won’t dry out. For more on how to get your bulbs off to a strong start, see our guide on how to grow amaryllis bulbs indoors successfully.
The Fertilizer Mistake That Almost Killed My Bloom
You might think more fertilizer means bigger flowers—it’s what I thought too. Using a strong 20-20-20 fertilizer every week gave me tall floppy leaves but zero flowers. What gives?
The magic happened when I cut fertilizer strength in half and fed only every three weeks. That slower pace mimics how bulbs naturally take up nutrients: gently and steadily—not shoved down their throats all at once.
Also, not all fertilizers are equal. The one that worked best for me was Espoma Garden-Tone 3-4-4, an organic option with a touch more phosphorus to encourage blooms without overfeeding leaves.
My feeding routine now:
- Dilute Espoma Garden-Tone to half strength
- Feed every three weeks during growth (never more often)
- Stop fertilizing completely during dormancy
It took some patience to get this right—don’t rush or overdo it!
Rot Is Not Just About Watering Less
I used to blame rot on overwatering alone—and lost two bulbs despite watering carefully. The real problem? Poor airflow around the soil surface and pot design.
Switching from plastic pots to terracotta with multiple drainage holes made a huge difference because terracotta breathes and dries faster. Elevating pots slightly on small feet lets air circulate underneath, helping moisture evaporate quickly.
I also started lightly dusting topsoil with horticultural charcoal, which acts like a natural fungicide barrier against rot-causing nasties.
If you spot soft spots or weird smells early on: don’t panic! Cut away mushy bits with sterilized scissors and repot immediately into fresh soil mix. Sometimes you can save part of your bulb if you act fast enough.
Light Isn’t Just Brightness — It’s Timing Too
Another rookie mistake: putting my amaryllis by an east-facing window thinking morning sun is enough. Nope. They want bright indirect light for at least six hours each day during growth—south-facing windows in winter work best.
One winter, after moving bulbs to a sun-soaked window ledge behind sheer curtains (to avoid leaf burn), I got flower stalks within six weeks—a rare sight in my house before that moment!
Don’t Skip Dormancy — It’s Crucial
Many guides treat dormancy as optional or just “rest time.” But forcing continuous growth by constant feeding or light burns bulbs out fast.
After blooming, give your amaryllis an 8–10 week rest in cooler conditions (around 55°F) with minimal watering until leaves yellow and die back naturally. This reset triggers next season’s bloom cycle like clockwork.
For a complete overview of the amaryllis lifecycle and care stages, see our complete overview of amaryllis plant care and blooming. If you want to ensure your amaryllis blooms right on schedule, check out the step-by-step guide to forcing amaryllis to bloom on time.
What I Wish Someone Had Told Me When I Started
Forget trying to brute-force blooms with fertilizer or blindly following vague instructions about “balanced soil.” Instead:
- Use a soil mix heavy on aeration: about 40% perlite + 30% Sphagnum peat moss + 30% worm castings compost
- Choose an organic fertilizer like Espoma Garden-Tone 3-4-4 diluted to half strength
- Feed only every three weeks during active growth phases
- Plant bulbs in terracotta pots with lots of drainage holes raised slightly off surfaces
- Provide at least six hours of bright indirect light daily (south-facing windows are ideal)
- Commit fully to an 8–10 week cool dormant period after blooming—no fertilizer or heavy watering
Yes, it sounds fiddly—but after losing many bulbs myself (and watching friends do the same), these changes turned my sad shoots into reliable seasonal showstoppers year after year.
Let’s Wrap This Up With Clear Next Steps You Can Do Today:
- Hunt down Sphagnum peat moss, perlite, and worm castings compost from trusted local suppliers (skip generic bagged mixes).
- Mix them roughly 40% perlite : 30% peat moss : 30% worm castings by volume for perfect drainage plus moisture retention.
- Repot your amaryllis into terracotta pots with multiple drainage holes; elevate them slightly using pot feet or small blocks.
- Use Espoma Garden-Tone 3-4-4 organic fertilizer diluted at half strength every three weeks while growing; stop feeding during dormancy entirely.
- Place your plant near a south-facing window behind sheer curtains for gentle bright light lasting six hours daily minimum—especially important in winter!
- After blooming finishes, give your bulb an 8–10 week rest in cooler (~55°F), darker conditions with minimal watering until leaves fade naturally.
A Little Honest Advice From Someone Who's Been There:
Your amaryllis isn’t just another houseplant—it’s more like a patient friend who rewards thoughtful care with unforgettable flowers if you're willing to listen closely—and adjust as needed.
Those floppy leaves? Soggy soils? Mushy bases? They’re talking! Don’t ignore them—they’re telling you what needs fixing.
And hey—if you mess up? Perfectly normal! Every failure is dirt under your fingernails teaching you what not to do next time.
Keep experimenting gently—you’ll get there quicker than you think.
Soon enough, those trumpet-shaped blossoms will burst open right on schedule—and you’ll know it wasn’t luck but smart soil choices paired with patient feeding that got you there.
Happy growing!
If you want a quick troubleshooting cheat sheet or have questions about watering schedules or signs of nutrient problems, just ask—I’m happy to help make this easier!


