Top Coral Bells Varieties for Shade and Sun: Expert Insights & Rankings
Walking into a garden center for Coral Bells (Heuchera) can feel like staring at an artist’s paintbox—every shade imaginable, from near-black to electric lime. But after years of planting, replacing, and sometimes cursing these beauties in my clients’ gardens, I’ve learned that most “one-size-fits-all” advice leaves you with faded foliage and unmet expectations. Here’s what actually works—drawn from hands-in-the-dirt experience.
Sun vs. Shade: The Reality Check
If you’ve ever lost a prized Heuchera to crispy leaves or leggy stems, you know the pain. The culprit is usually mismatched sunlight—not poor plant quality. Plant tags often promise “part sun to part shade,” but that’s as helpful as recipe instructions that say “cook until done.”
Here’s what I’ve found:
- Too much sun: Leaves bleach or burn, especially on lighter varieties.
- Too much shade: Foliage loses its punch and plants stretch awkwardly for light.
My rule: When in doubt, start with morning sun and afternoon shade. Then adjust based on real results, not wishful thinking.
My Battle-Tested Favorites: What Survived (and Thrived)
Best Performers in Sun
‘Palace Purple’
I was skeptical the first time I planted this along a south-facing fence—blazing sun from 11am–3pm—but by late July, its burgundy leaves had deepened instead of fading. I measured 6 hours of direct sun before any sign of edge crisping. With monthly compost top-ups and mulch (kept 2” away from crowns), they lasted five years before needing division.
‘Electric Lime’
This one was a gamble in a client’s west-facing border where midday rays are unforgiving. It kept its neon glow best when shaded after 1pm; too much exposure dulled the color within two weeks during a 2021 heatwave (95°F+). Lesson: Morning sun = vibrant color; all-day glare = disappointment.
‘Fire Chief’
Placed next to silver Artemisia for contrast, it held red hues through August drought with only deep watering every ten days (I use a soil moisture meter called the XLUX T10 to check before watering). Paler varieties nearby faded; ‘Fire Chief’ powered through.
‘Caramel’
In northern gardens I’ve designed (think Milwaukee), this amber-leaved type handled full morning sun until noon with grace—even during surprise May frosts or hot snaps. In southern states? Afternoon shade is mandatory unless you want toasted edges by midsummer.
Reliable Standouts for Shade
‘Marmalade’
Most orange Heucheras fizzled in dense maple shade behind my garage—except ‘Marmalade.’ Its color stayed rich even after dry spells when other varieties wilted out. Watering every 5 days and using pine bark mini-nuggets as mulch did wonders.
‘Silver Scrolls’
The only variety in my north-side test bed that never got leggy under zero direct sun. Its silvery tops don’t fade—a bonus if your foundation beds barely see daylight past March.
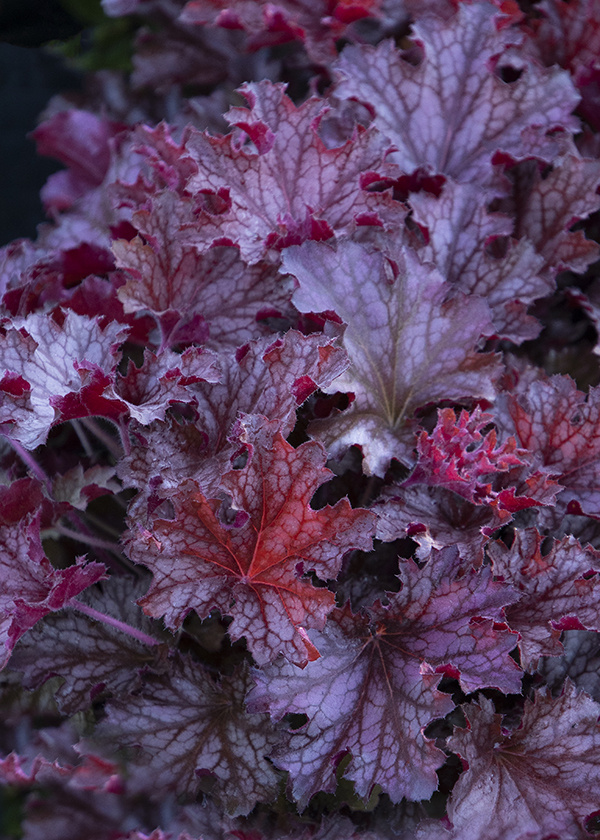
‘Obsidian’
Think “black velvet.” Even tucked under dense lilacs where only dappled rays filter through mid-June onward, it stayed glossy and compact while paler types went pale green or sulked.
‘Green Spice’
For clients who hate drama but need subtle color lifts near shady porches—this one stays tidy and keeps those cool metallic tones without bleaching out or getting floppy.
Unexpected winner: Last summer I trialed ‘Berry Marmalade’ behind an old shed—barely three hours of filtered light—and it surprised me by holding deep rose notes all season long while others around it turned drab.
Problem-Solving in Real Gardens
Let me walk you through two actual scenarios:
Scenario #1: The Sun/Shade Gauntlet
A client had a narrow side bed: roasting hot by the driveway gate but shaded by their neighbor’s walnut tree at the far end.
- Near the gate: Planted ‘Palace Purple’ + ‘Electric Lime.’ By week six post-planting (late May), both looked better than anything else I’d tried there.
- Transition zone: Added two clusters of ‘Caramel.’ They bridged the gap perfectly—no scorched tips even after June storms followed by dry spells.
- Shady end: Went classic with ‘Marmalade’ + ‘Silver Scrolls,’ which didn’t skip a beat even when summer temps hit high 80s with less frequent watering due to shade-retained moisture.
Scenario #2: One Big Container
A friend wanted year-round leaf interest on her partly sunny patio. We combined:
- Center: 'Obsidian' for drama
- North side: 'Green Spice' for subtle shimmer
- South edge: 'Palace Purple,' facing morning light
That container still looks good nine months later—with only monthly liquid kelp feedings and weekly water checks using my knuckle-test (if soil's dry up to second knuckle, water).
Common Pitfalls—and How to Outsmart Them
Mistake #1: Assuming all Heucheras thrive in heavy shade
Solution: Test new types in quart pots before planting en masse; track which ones keep color/compactness over three months.
Mistake #2: Overestimating full-sun tolerance
Solution: For any spot that bakes past noon, provide backup planters so you can shuffle struggling plants temporarily; throw up temporary row covers during heatwaves above 90°F (I use old sheer curtains).
Mistake #3: Ignoring drainage
Solution: If puddles linger more than half an hour post-watering, mound beds at least 2" higher than surrounding soil—or mix in coarse sand/grit during planting. Soggy roots = dead Coral Bells every time.
Mistake #4: Watering as often as petunias
Solution: Only water once top inch dries out—even if neighbors insist otherwise! Soggy crowns rot faster than you’d believe (ask me how many times I've learned this lesson).
Five Practical Tips That Actually Make a Difference
- Compost First — Not After Problems Start: Digging in two big handfuls per square foot at planting makes more difference than any fancy fertilizer later.
- Mulch Smartly: Keep mulch off the crown by creating a donut ring around each plant—prevents rot after heavy rains.
- Dividing? Use Your Hands Not Tools: Roots snap less if gently pulled apart versus chopped; aim for every three years just as new growth emerges.
- Minimal Fertilizer Pays Off: Once-a-year dose of Espoma Plant-tone or similar balanced organic food in early spring keeps colors vivid without forcing floppy growth.
- Winter Watchfulness Matters: In freeze/thaw climates, gently press lifted crowns back down if frost heave occurs—they’ll rebound faster come spring compared to ignoring them till April (trust me—I lost five clumps one winter by waiting too long).
Next Steps You Can Take Today
- Walk your yard at breakfast/lunch/dinner times; note exactly where shadows fall each hour.
- Mark zones on paper or your phone where bold foliage is needed—the act of mapping saves endless replanting later!
- Pick just TWO varieties each for sunny/mixed/shady spots—you’ll learn faster what works vs flopping everywhere.
- Prep sites now with extra compost and check drainage before buying plants—a $15 bag saves dozens later spent replacing failed starts.
- After planting? Snap weekly phone pics so you can see progress—or problems—before they become disasters!
Gardening isn’t about always getting it right on the first try—it’s about making informed choices based on real results and tweaking along the way without guilt or panic-buying replacements midseason. Every successful patch of Coral Bells I’ve seen came after at least one round of “oops!” moments—and plenty of notes scribbled on garden maps with dates (“scorched here July ’22!”).
Try something bold this season: trust your own observations over textbook advice and don’t be afraid to move things around when reality doesn’t match theory! Your future self—and your garden beds—will thank you for it when those colors stay bright long after everyone else’s have wilted away.
Ready to dig in? Your best Coral Bells display isn’t just possible—it’s inevitable once you let real-world results guide your hand!